Writing Custom Reports with Spira (Part 3)
October 15th, 2015 by inflectra
One of the maxims I always tell developers is that regardless of what you build, customers will never be satisfied with the reports you offer or the integration that you provide. In fact the two most underestimated tasks in software development are data feeds and reporting. So one of the nice features in SpiraTeam is the ability to do custom reporting, so that you are not limited to just the reports that ship with the system. This article is the third in a series that explains how to use these powerful custom reporting features.
In this article we shall be creating a branch new custom report that has a custom header, footer and a custom section that displays data based on a custom ESQL (Entity SQL) query. This is useful in cases where you have some special metrics that you want to be able publish in a report.
Creating the New Report
The first thing we need to do is go to the Administration > System > Edit Reports page:

and click on the Add New Report option. This will bring up the page that lets you create a new report:

Enter the name and Description of your new report (the description is optional and is just to describe the purpose of the report, the text is not displayed in the report itself). For example we will enter:
- Name = Test Case Summary Metrics Report
- Description = This report shows a table containing the summary number of passes and fails per release in our project
Now enter in some text for the header and footer of the report (these will be displayed at the top and bottom of the entire report):
- Header = This report displays the number of passed and failed test cases per release in the project:
- Footer = (c) Copyright MyCompany 2015, All Rights Reserved
For our report, we'll choose the following formats and category:
- Formats = MS-Word 2007, 2003, PDF and HTML
- Category = Test Case Reports
The format choice is up to you, however the category is important because (a) it determines which category the report will appear under in the reporting home page, and (b) it will determine the permissions that the user needs to have to run your report.
Now before we add a custom section, we would like to include the name of the project and its description into the top of the report, underneath the header. To do that, click on the Add New Standard Section button and that will display the Standard Section dialog box:

On this page, choose the 'Project Overview' section from the dropdown list and then click 'Create Default Template' to display the standard XSLT template used for this report. This will populate the Template field with the standard Project Overview XSLT template. As described in the second part of this series, you can modify this XSLT to adjust how the Project Overview is displayed.
Click on the Save button.
Now we need to add our new custom section that contains our ESQL query. Click on the Add New Custom Section button and the new custom section dialog is displayed:
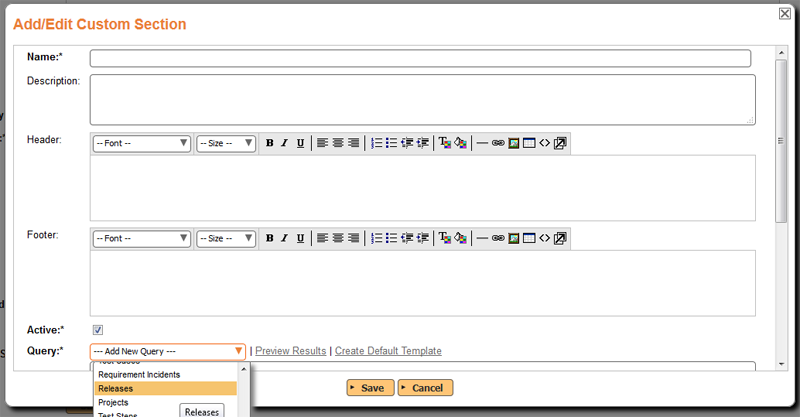
In this dialog box, we need to enter the name of the new section, a description, header, footer and then our ESQL query that is used to retrieve the data we need. For this example we'll enter:
- Name - Test Case Counts By Release
- Description - (leave this blank)
- Header - Enter in the text 'Test Summary by Release' and make it bold and underlined.
- Footer - Insert a simple horizontal line
Now in the query section, choose 'Releases' as the base query to use. This will insert the following query:
select value R from SpiraTestEntities.R_Releases as R where R.PROJECT_ID = ${ProjectId}
Click on the Preview Results button to display the table of all the release fields. From this we can see what we want to include in the query:
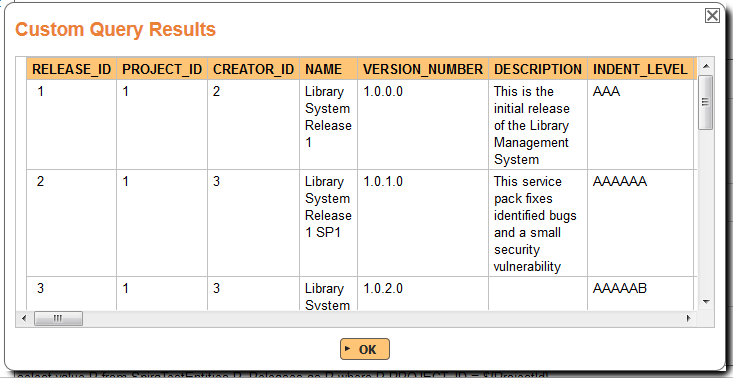
Now change the query to only include the data that we want:
select R.NAME, R.VERSION_NUMBER, R.COUNT_PASSED, R.COUNT_FAILED, R.COUNT_NOT_RUN, R.COUNT_BLOCKED, R.COUNT_CAUTION from SpiraTestEntities.R_Releases as R where R.PROJECT_ID = ${ProjectId}
This will display the release name, and the test case counts for the current project. It will also include the deleted releases, so we need to add on a clause to the WHERE part of the query to make sure they are excluded:
select R.NAME, R.VERSION_NUMBER, R.COUNT_PASSED, R.COUNT_FAILED, R.COUNT_NOT_RUN, R.COUNT_BLOCKED, R.COUNT_CAUTION from SpiraTestEntities.R_Releases as R where R.PROJECT_ID = ${ProjectId}

and R.IS_DELETED = False
Click on the Preview Results button again to display the data we want:
| NAME | VERSION_NUMBER | COUNT_PASSED | COUNT_FAILED | COUNT_NOT_RUN | COUNT_BLOCKED | COUNT_CAUTION |
|---|---|---|---|---|---|---|
| Library System Release 1 | 1.0.0.0 | 0 | 2 | 4 | 0 | 1 |
| Library System Release 1 SP1 | 1.0.1.0 | 3 | 0 | 3 | 1 | 0 |
| Library System Release 1 SP2 | 1.0.2.0 | 2 | 0 | 5 | 0 | 0 |
To change the names of the columns to look a bit nicer, we can change the generated template. To do this, first click Create Default Template to generate the standard XSLT template for this query:
<?xml version="1.0" encoding="utf-8"?>
<xsl:stylesheet version="1.0" xmlns:xsl="http://www.w3.org/1999/XSL/Transform" xmlns:msxsl="urn:schemas-microsoft-com:xslt" exclude-result-prefixes="msxsl">
  <xsl:template match="/RESULTS">
    <table class="DataGrid">
      <tr>
        <th>NAME</th>
        <th>VERSION_NUMBER</th>
        <th>COUNT_PASSED</th>
        <th>COUNT_FAILED</th>
        <th>COUNT_NOT_RUN</th>
        <th>COUNT_BLOCKED</th>
        <th>COUNT_CAUTION</th>
      </tr>
      <xsl:for-each select="ROW">
        <tr>
          <td><xsl:value-of select="NAME"/></td>
          <td><xsl:value-of select="VERSION_NUMBER"/></td>
          <td><xsl:value-of select="COUNT_PASSED"/></td>
          <td><xsl:value-of select="COUNT_FAILED"/></td>
          <td><xsl:value-of select="COUNT_NOT_RUN"/></td>
          <td><xsl:value-of select="COUNT_BLOCKED"/></td>
          <td><xsl:value-of select="COUNT_CAUTION"/></td>
        </tr>
      </xsl:for-each>
    </table>
  </xsl:template>
</xsl:stylesheet>
To change the column headings to make them look better, we can change the template to look like this:
<?xml version="1.0" encoding="utf-8"?>
<xsl:stylesheet version="1.0" xmlns:xsl="http://www.w3.org/1999/XSL/Transform" xmlns:msxsl="urn:schemas-microsoft-com:xslt" exclude-result-prefixes="msxsl">
  <xsl:template match="/RESULTS">
    <table class="DataGrid">
      <tr>
        <th>Release</th>
        <th>Version</th>
        <th># Passed</th>
        <th># Failed</th>
        <th># Not Run</th>
        <th># Blocked</th>
        <th># Caution</th>
      </tr>
      <xsl:for-each select="ROW">
        <tr>
          <td><xsl:value-of select="NAME"/></td>
          <td><xsl:value-of select="VERSION_NUMBER"/></td>
          <td><xsl:value-of select="COUNT_PASSED"/></td>
          <td><xsl:value-of select="COUNT_FAILED"/></td>
          <td><xsl:value-of select="COUNT_NOT_RUN"/></td>
          <td><xsl:value-of select="COUNT_BLOCKED"/></td>
          <td><xsl:value-of select="COUNT_CAUTION"/></td>
        </tr>
      </xsl:for-each>
    </table>
  </xsl:template>
</xsl:stylesheet>
Once you are happy with the result, click on the Save button on the custom section and then the Save button on the report editing screen itself.
You can now run the report through the main reports center and get something like:
| Release | Version | # Passed | # Failed | # Not Run | # Blocked | # Caution |
|---|---|---|---|---|---|---|
| Library System Release 1 | 1.0.0.0 | 0 | 2 | 4 | 0 | 1 |
| Library System Release 1 SP1 | 1.0.1.0 | 3 | 0 | 3 | 1 | 0 |
| Library System Release 1 SP2 | 1.0.2.0 | 2 | 0 | 5 | 0 | 0 |
Conclusion
Now we have learned how to create a custom report and a use a combination of standard sections and custom sections to product a report that includes data specific to your business. You can use your knowledge of SQL and XSLT to make more sophisticated changes. For example you could join multiple tables and use SQL aggregation functions to generate summary reports from other parts of the system.
For further reading on the subject of custom reports, take a look at our knowledge base:
Spira Helps You Deliver Quality Software, Faster and with Lower Risk.
Get Started with Spira for FreeAnd if you have any questions, please email or call us at +1 (202) 558-6885