To provision a new project with TaraVault, go to the main Spira Administration page and select the
appropriate project and then go to the TaraVault administration page. For example, in the screenshot
below we have selected the ‘Library Information System’ sample project:

To provision this project with TaraVault, you need to choose
the following:
- Project
Name – this is the name of the project in TaraVault. This name is
incorporated into the connection URL so it should be alphanumeric only.
- Project
Type – this is the type of SCM repository you wish to use. Currently the
choices are between Subversion and Git. We discuss the differences between
Subversion (also known as SVN) and Git in sections 4 and 5 respectively.
Note: once you choose the repository type for a project
it cannot be changed without deleting the entire repository, so make sure you
understand the differences between the two technologies beforehand.
For example we will choose ‘libraryinformationsystem’ as the
project name and ‘SVN’ (Subversion) as the project type. Once you are happy
with your choice, click ‘Activate’ to enable this project for TaraVault:
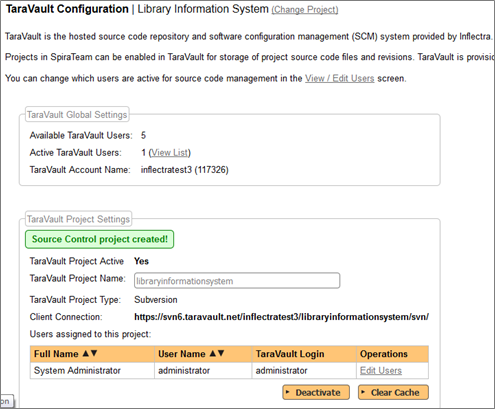
The system will then populate the ‘Client Connection’
section with the URL that you need to use to connect to this TaraVault project
from your Subversion or Git client.
In addition, it will display a list of users
that are enabled for this project.