Prerequisites
macOS
You will need a computer with macOS.
https://www.apple.com/macos
[macOS 14.4 Sonoma]
Xcode
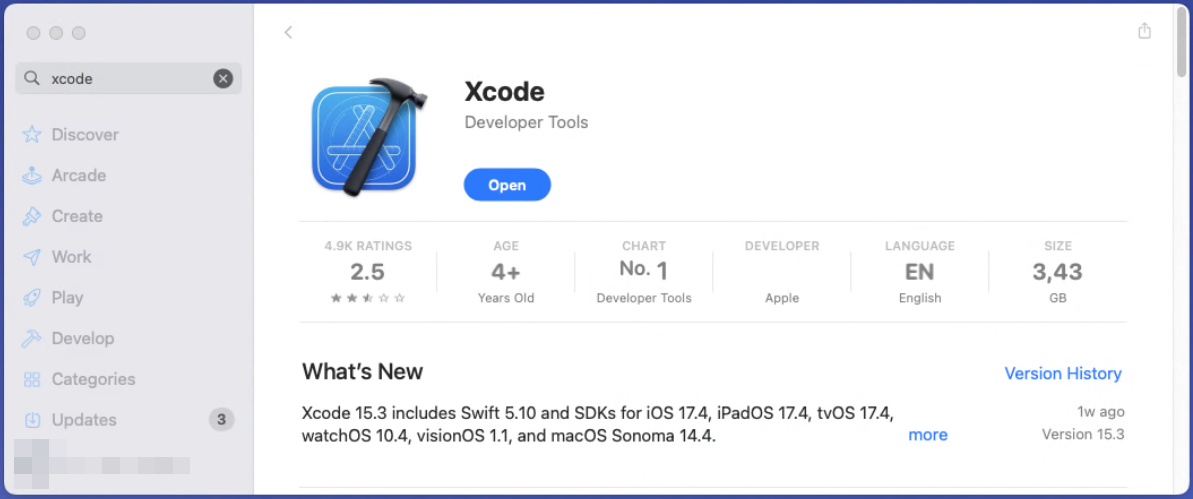
On this computer install Xcode development environment.
https://developer.apple.com/xcode/
[Xcode 15.3]
You can do it via the App Store.
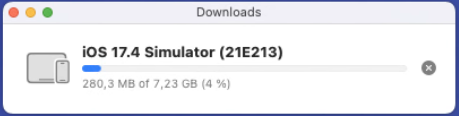
On first launch you may download the latest iOS platform.
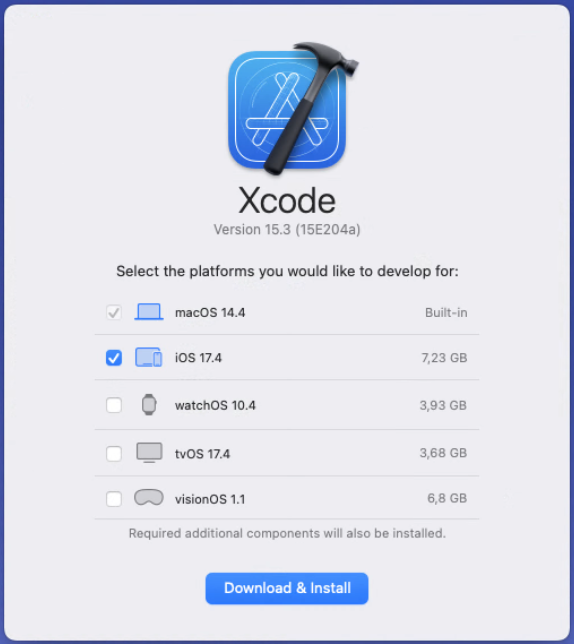
It will take a while.
If Xcode will close itself and won't show the progress dialog, just launch Xcode once again.
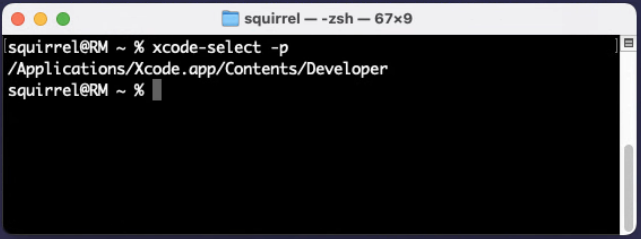
Make sure that Command Line Tools are installed:
- Open Terminal (you can find the Terminal application in the /Applications/Utilities/ directory, or you can search for it using Spotlight)
- Run the command and follow the prompts
xcode-select --install - Once installation is completed verify the result with the command
xcode-select -p
NodeJS
We recommend to manage NodeJs (node) with Node Version Manager (nvm).
https://github.com/nvm-sh/nvm
[nvm 0.39.7]
https://nodejs.org/en
[NodeJS 18.19.1]
nvm
1. Run the command
curl -o- https://raw.githubusercontent.com/nvm-sh/nvm/v0.39.7/install.sh | bash

2. If in the output you see that the installation script failed to update the profile file, because it is missing, create one with the command
touch ~/.zshrc
3. If you did the step #2 then rerun the step #1
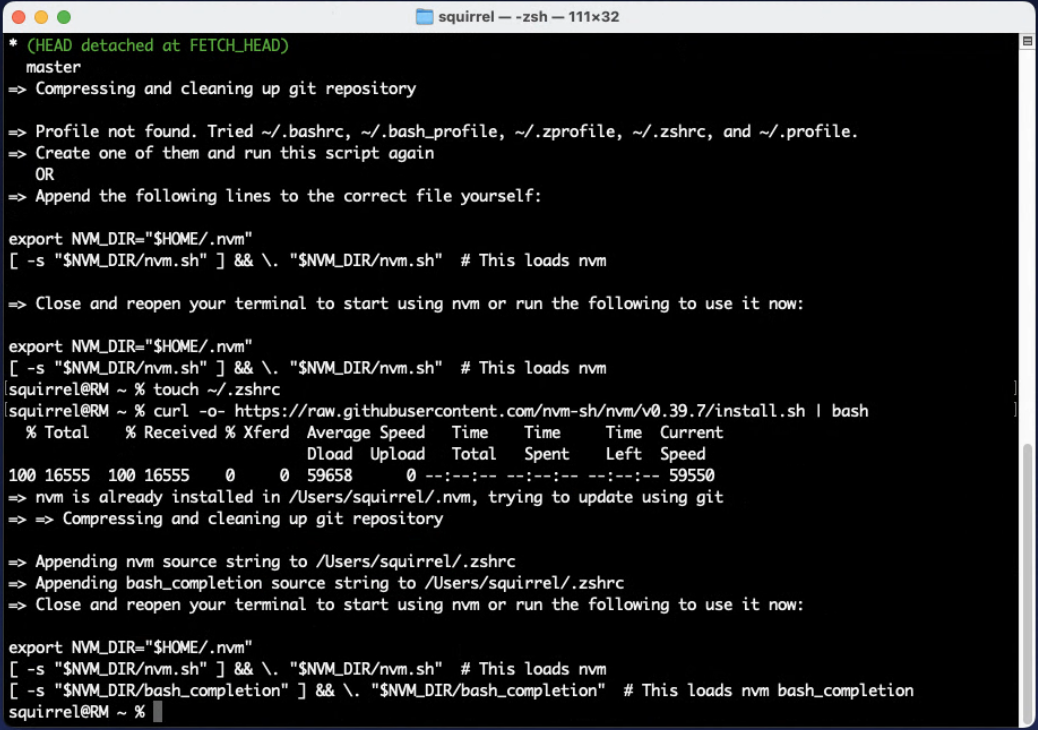
4. Reopen the terminal as suggested in the output. Verify that nvm is installed with the command
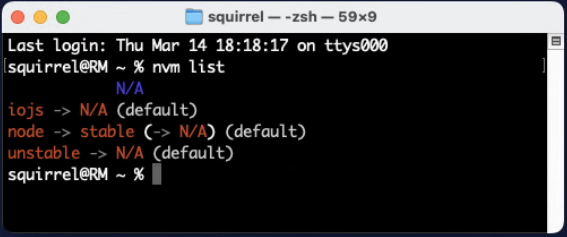
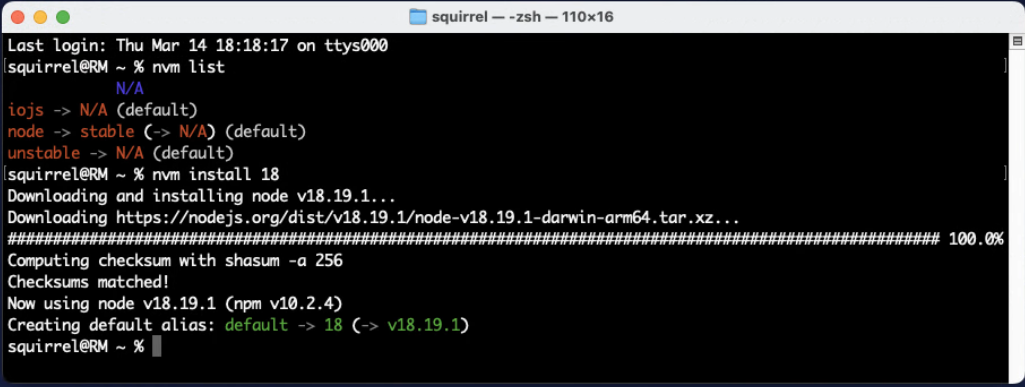
nvm list
node
Install node with the command
nvm install 18
It will install the latest build of NodeJS 18. In our case it was 18.19.1
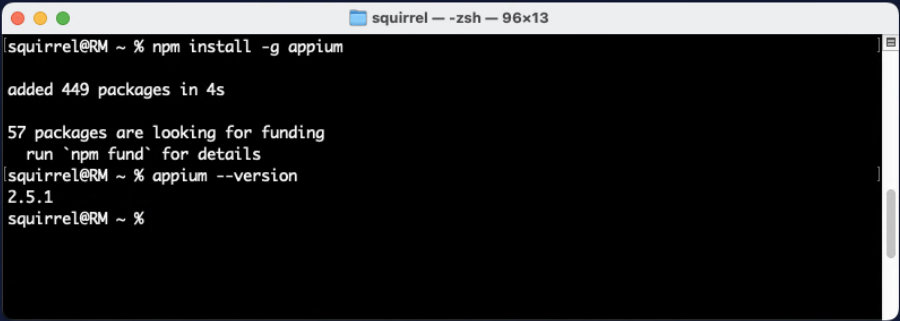
Appium
http://appium.io/
[Appium 2.5.1]
Appium is the bridge between Rapise and mobile simulators and devices. The easiest way to install it is to use Terminal.
npm install -g appium
Verify installation with
appium --version
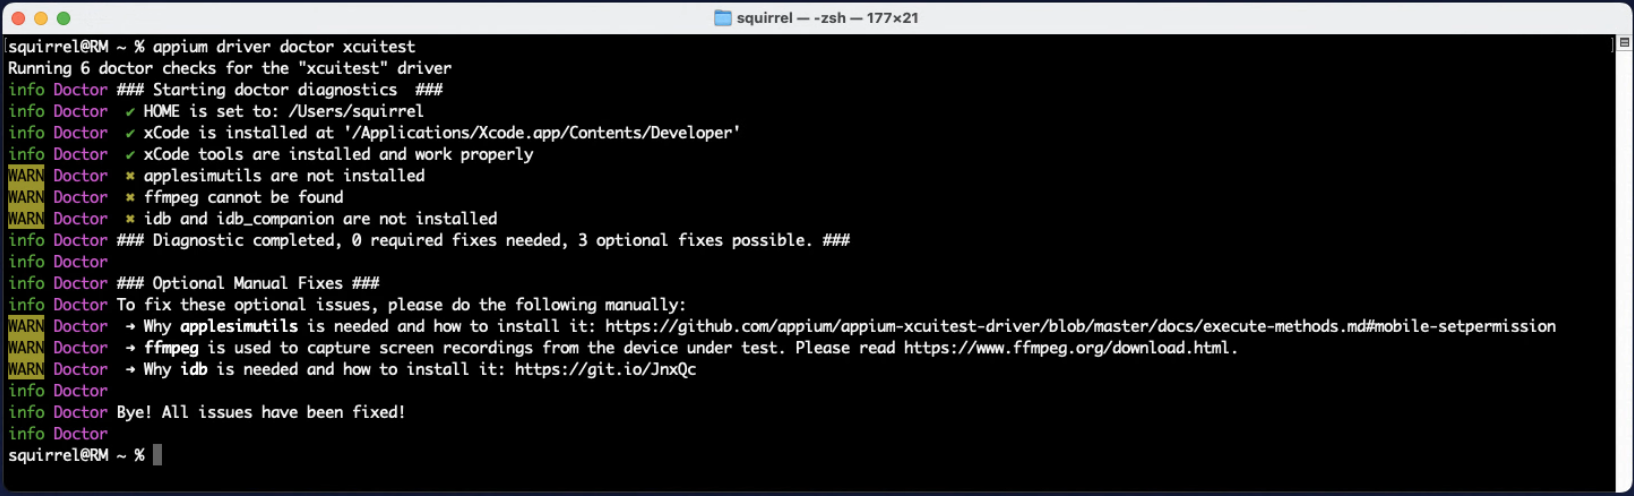
Next step is to install the driver for iOS
appium driver install xcuitest

[xcuitest 7.3.1]
Let's now validate proper environment setup for iOS automation.
appium driver doctor xcuitest
Sample Application
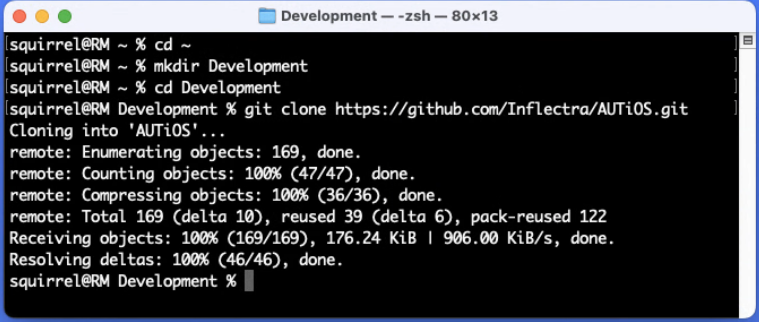
We published a sample application on GitHub. Clone the repository and build with XCode.
https://github.com/Inflectra/AUTiOS
https://github.com/Inflectra/AUTiOS.git
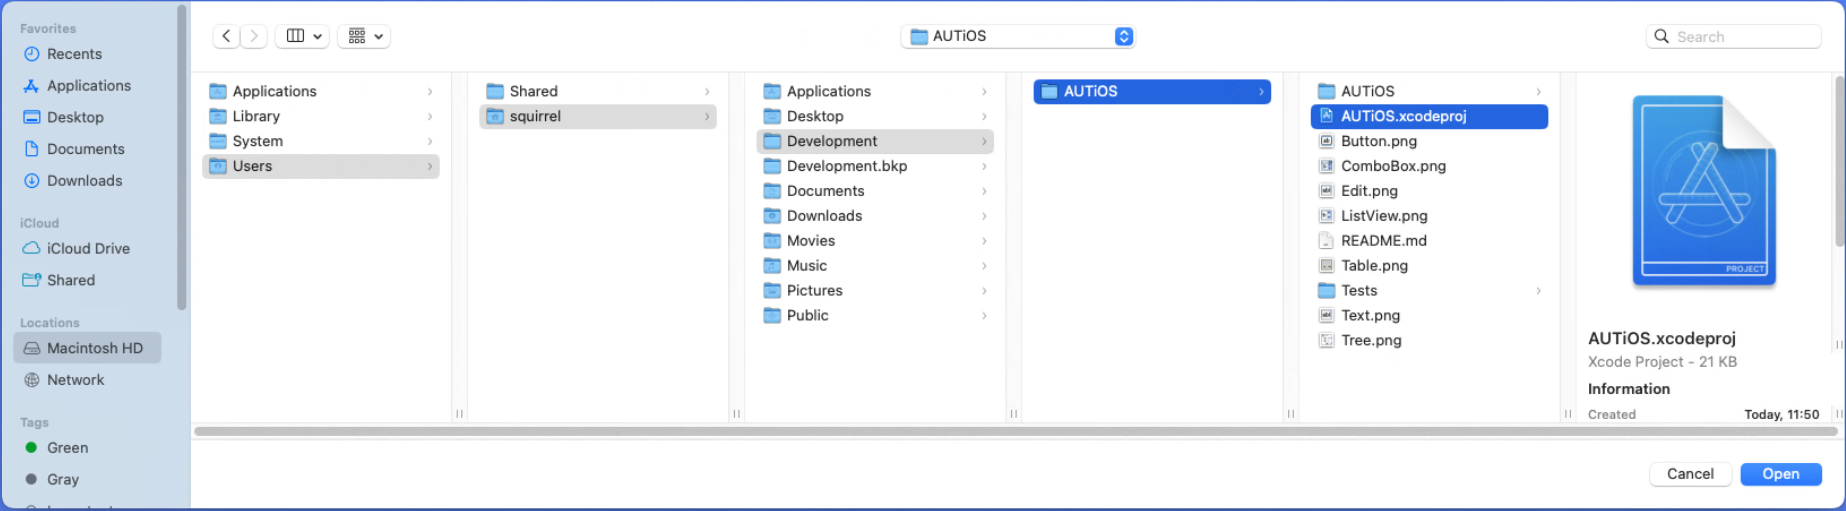
To clone the repository, run the commands in the terminal:
# Go to the Home directory
cd ~
# Create the Development directory inside it
mkdir Development
# Go to the Development directory
cd Develoment
# Clone the repository
git clone https://github.com/Inflectra/AUTiOS.git
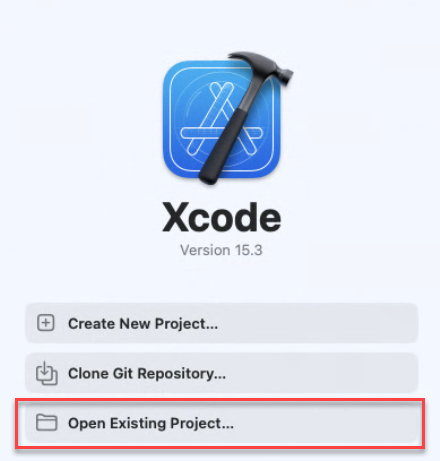
Launch Xcode and choose the repository.
Select the simulator to use and click run button.
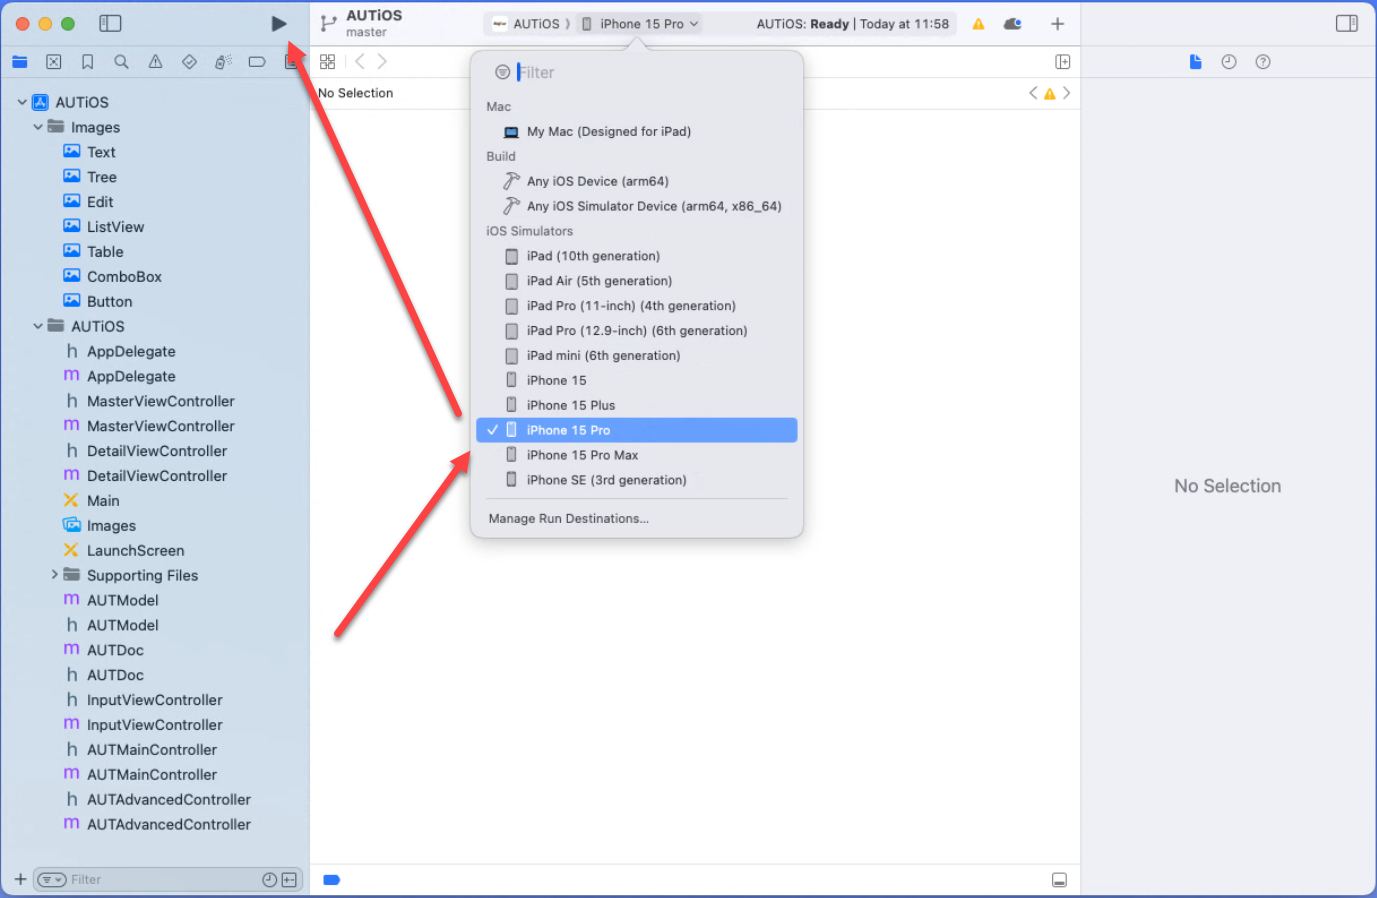
Xcode should build the application, start the simulator and run the application.
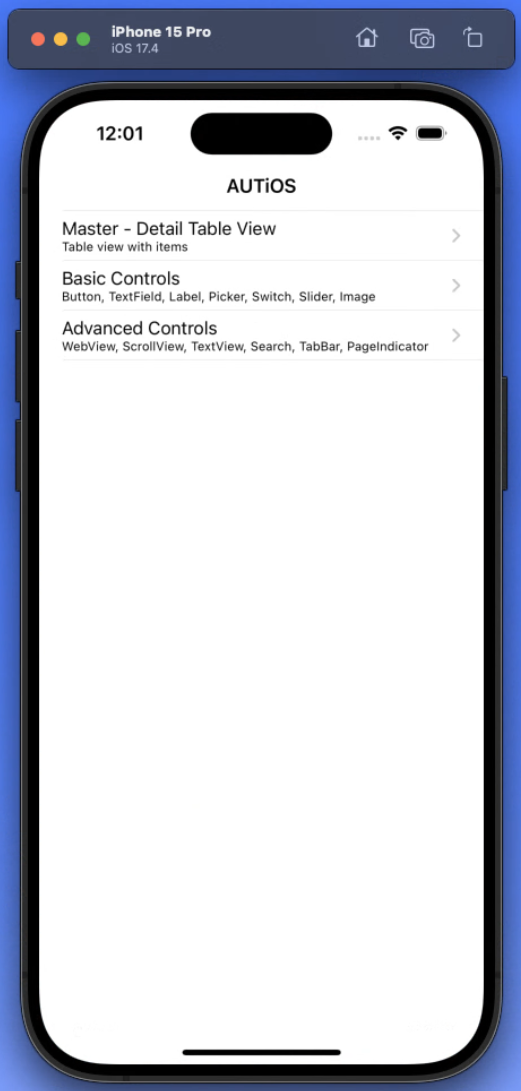
Stop the application.

Connecting to iOS Simulator from Rapise
We will now configure a Rapise test, run Appium and connect to the simulator.
Step #1
File > Create New > Test Automation Framework
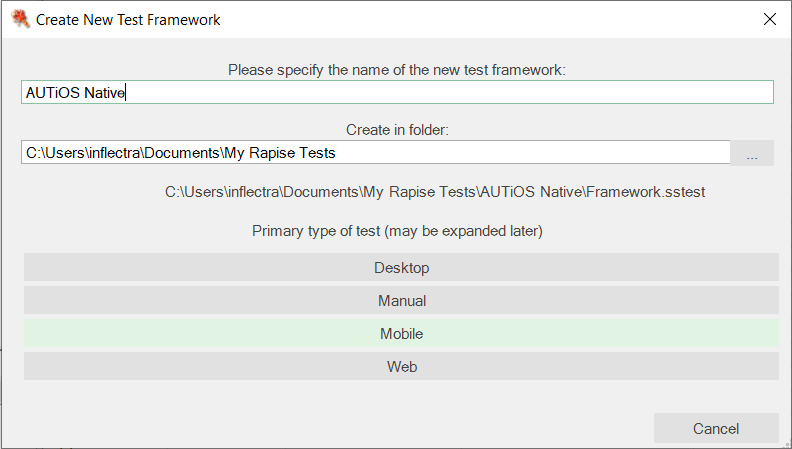
Choose iOS App Simulator profile.
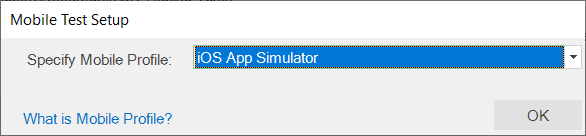
Open the Mobile Settings dialog.
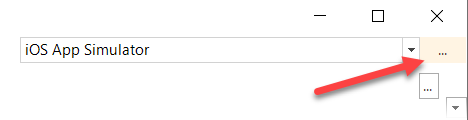
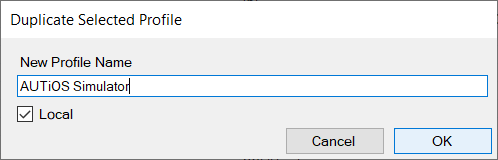
Click Duplicate button to create a framework specific mobile profile.

Set the name AUTiOS Simulator and click OK.
On the macOS machine open the terminal and start Appium with the command
appium
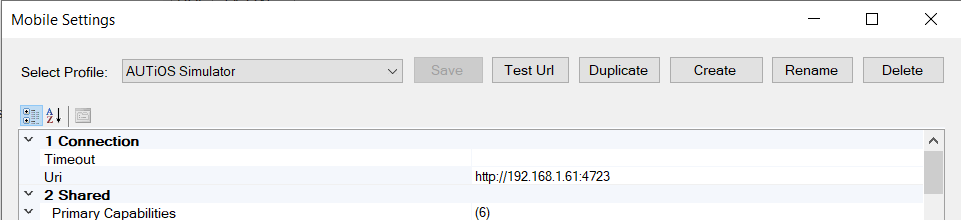
It will print the Appium URL that we should use in the mobile profile configuration in Rapise.
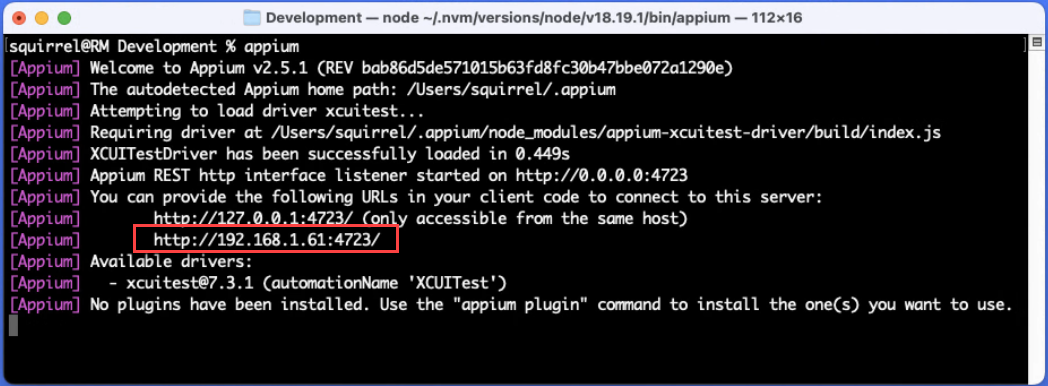
Remove the trailing slash from the URL
http://192.168.1.61:4723
Let's now gather all necessary information about our simulator and application.

Device Name
iPhone 15 Pro
iOS Version
17.4
Application Path
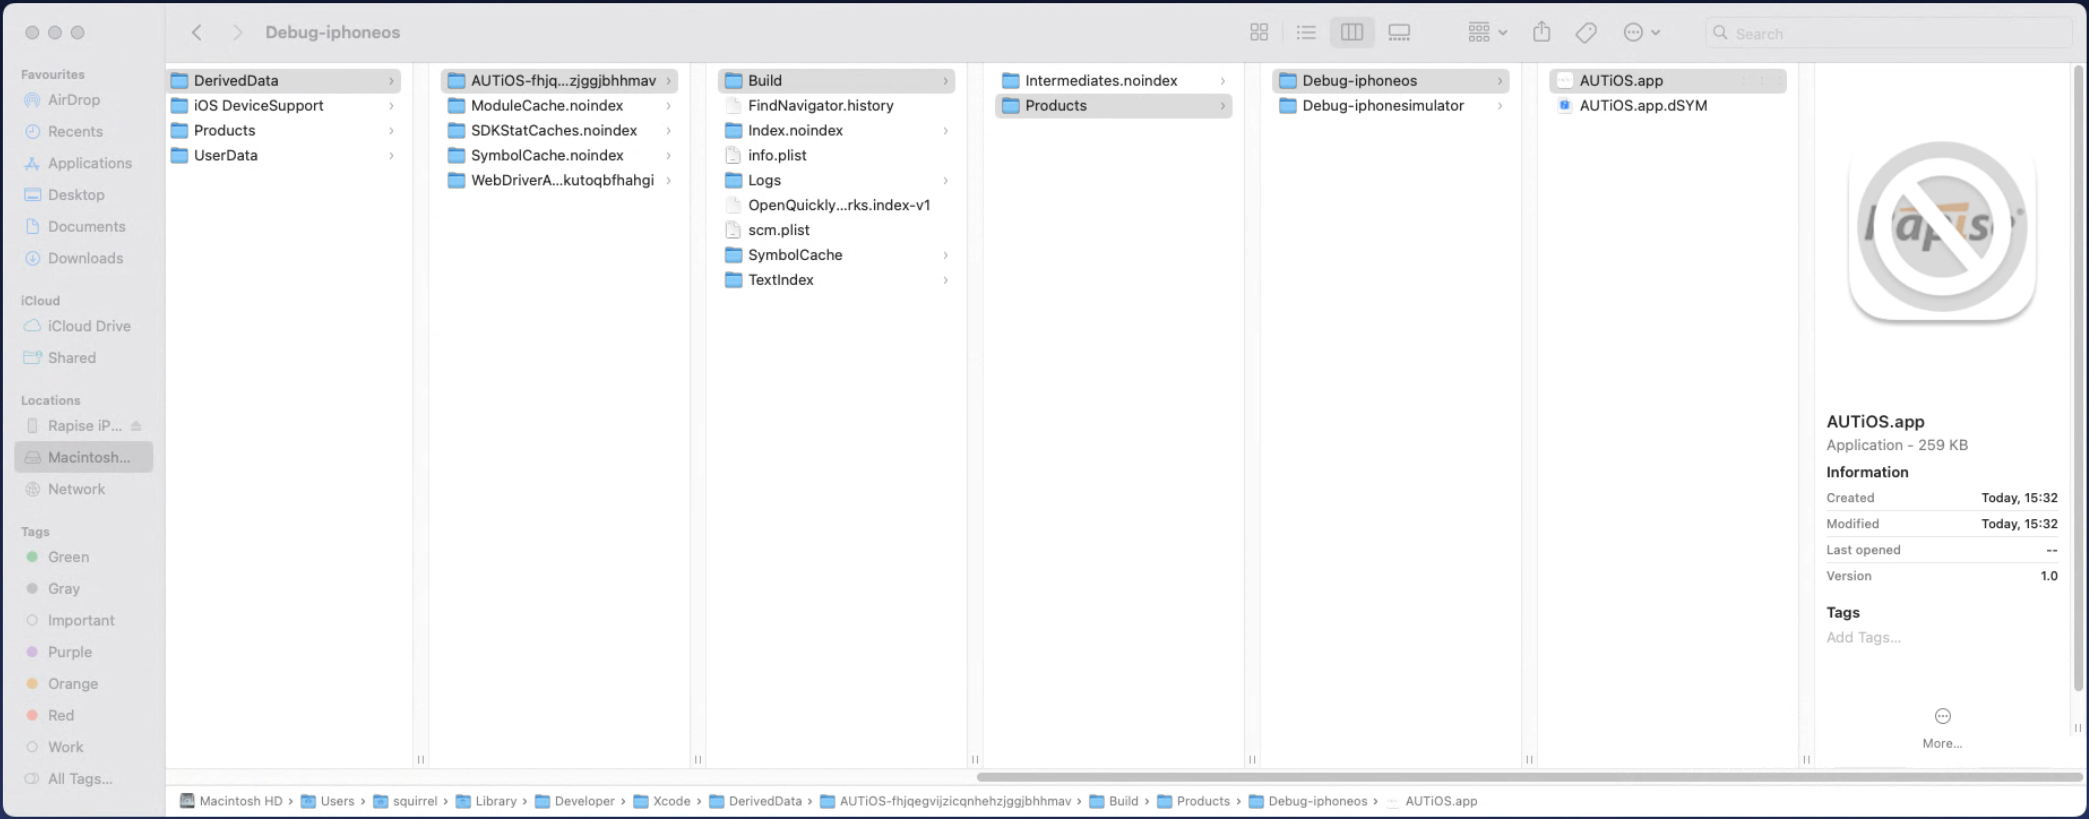
In Xcode 15, you can find out the path where an application was built by using the Derived Data directory. Here's how you can locate it:
Open Xcode Settings: Go to the menu bar and select "Xcode" > "Settings" or use the shortcut Command + ,.
Navigate to Locations: In the Settings window, click on the "Locations" tab.
View Derived Data Path: Under the "Derived Data" section, you'll see the path to the Derived Data directory. This is where Xcode stores build outputs, including the built application. You can click the arrow icon next to the path to open the Derived Data folder in Finder.
Find Your Application: Inside the Derived Data directory, navigate through the subdirectories related to your project. The path is usually something like:
DerivedData/<YourProjectName>-<Hash>/Build/Products/<BuildConfiguration>-<Platform>/
<YourProjectName> is the name of your project.<Hash> is a unique hash value generated by Xcode.<BuildConfiguration> is typically "Debug" or "Release", depending on how you built your app.<Platform> is typically "iphonesimulator" for simulator builds or "iphoneos" for actual device builds.
In this directory, you should find your built application, typically as an .app bundle.
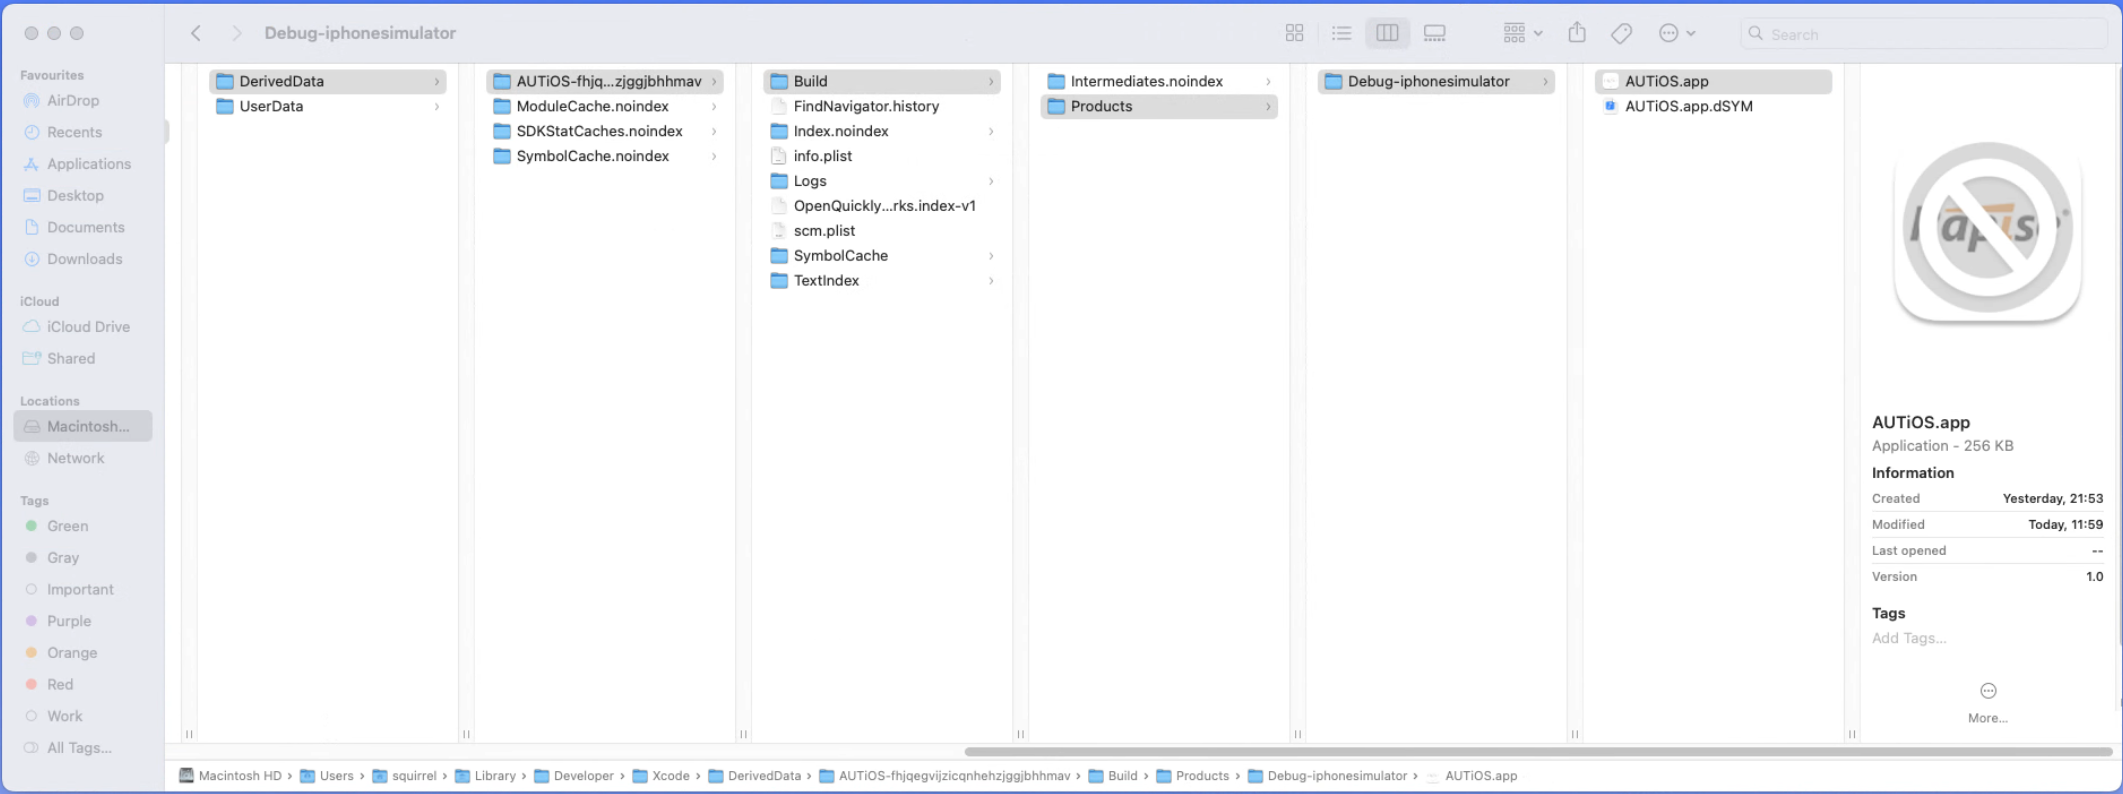
To get the path just drag & drop the .app file to a new terminal window.
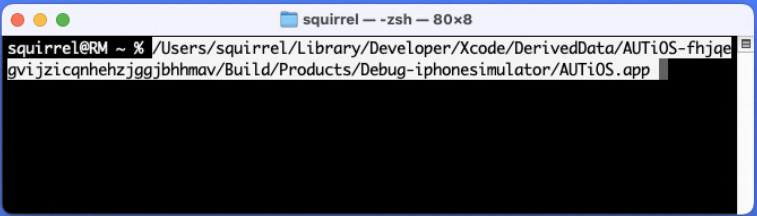
Copy the value and transfer to the machine where Rapise is installed.
/Users/squirrel/Library/Developer/Xcode/DerivedData/AUTiOS-fhjqegvijzicqnhehzjggjbhhmav/Build/Products/Debug-iphonesimulator/AUTiOS.app
Let's now finish the configuration of the mobile profile.

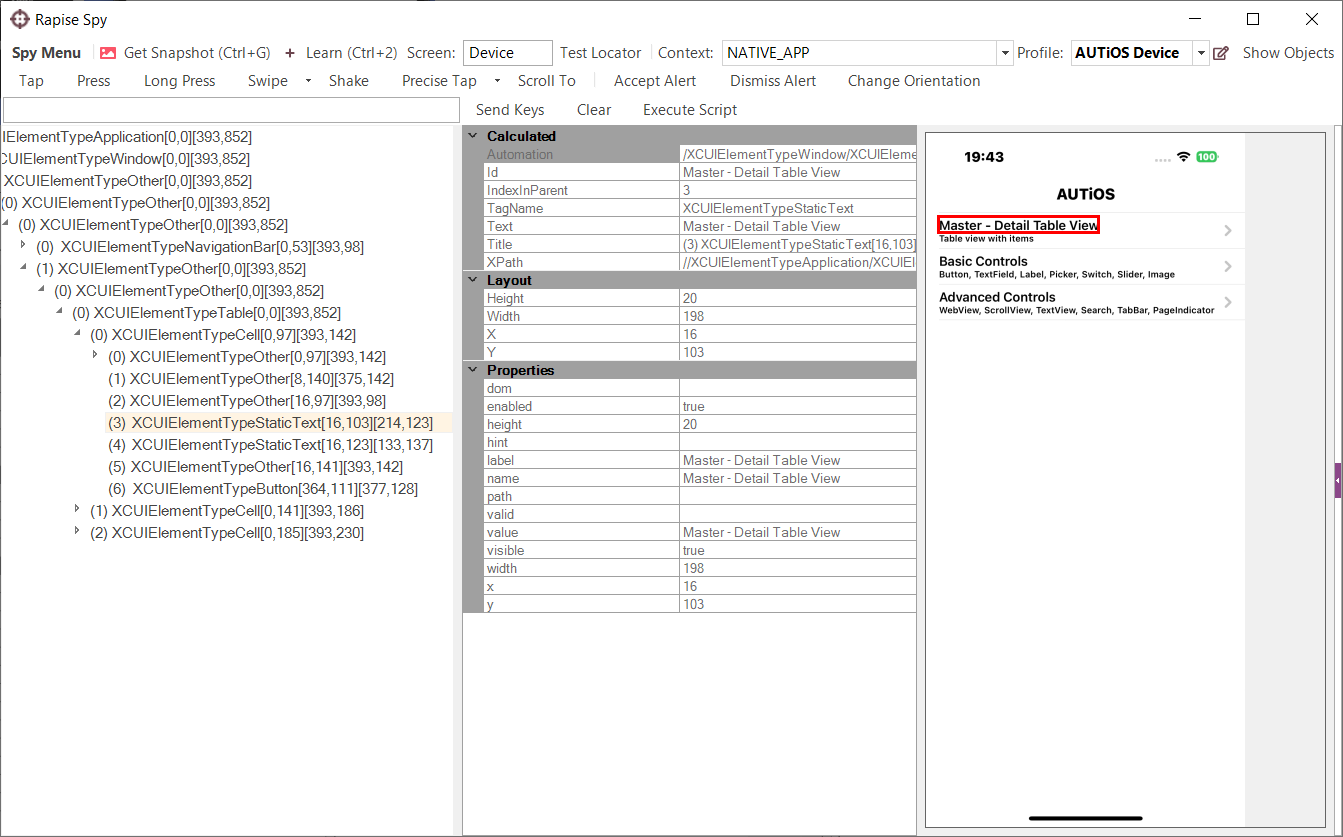
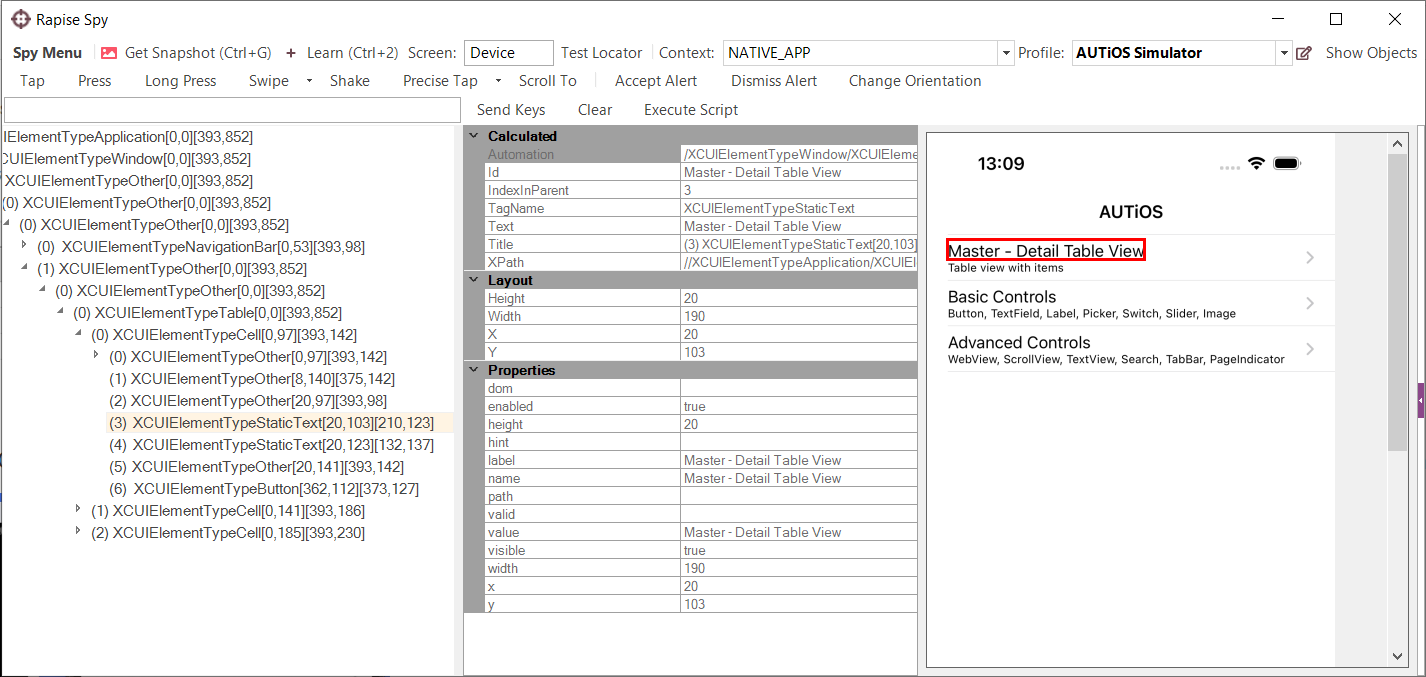
Click Close button, create new Test Case in Rapise and start the Mobile Spy from the toolbar. If during test creation you will be prompted to select a mobile profile, choose any profile (anyway the global profile of the framework is always used). If another Spy is selected switch to the Mobile Spy first (use the dropdown triangle icon on the right side of the Spy button).
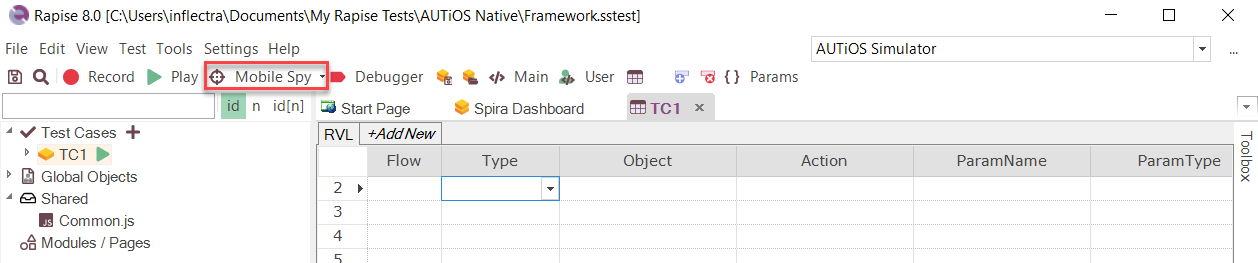
In the Mobile Spy click Get Snapshot button. If everything is OK then on the macOS host you will see Appium log messages running in the terminal and after a while the application will appear on the simulator.
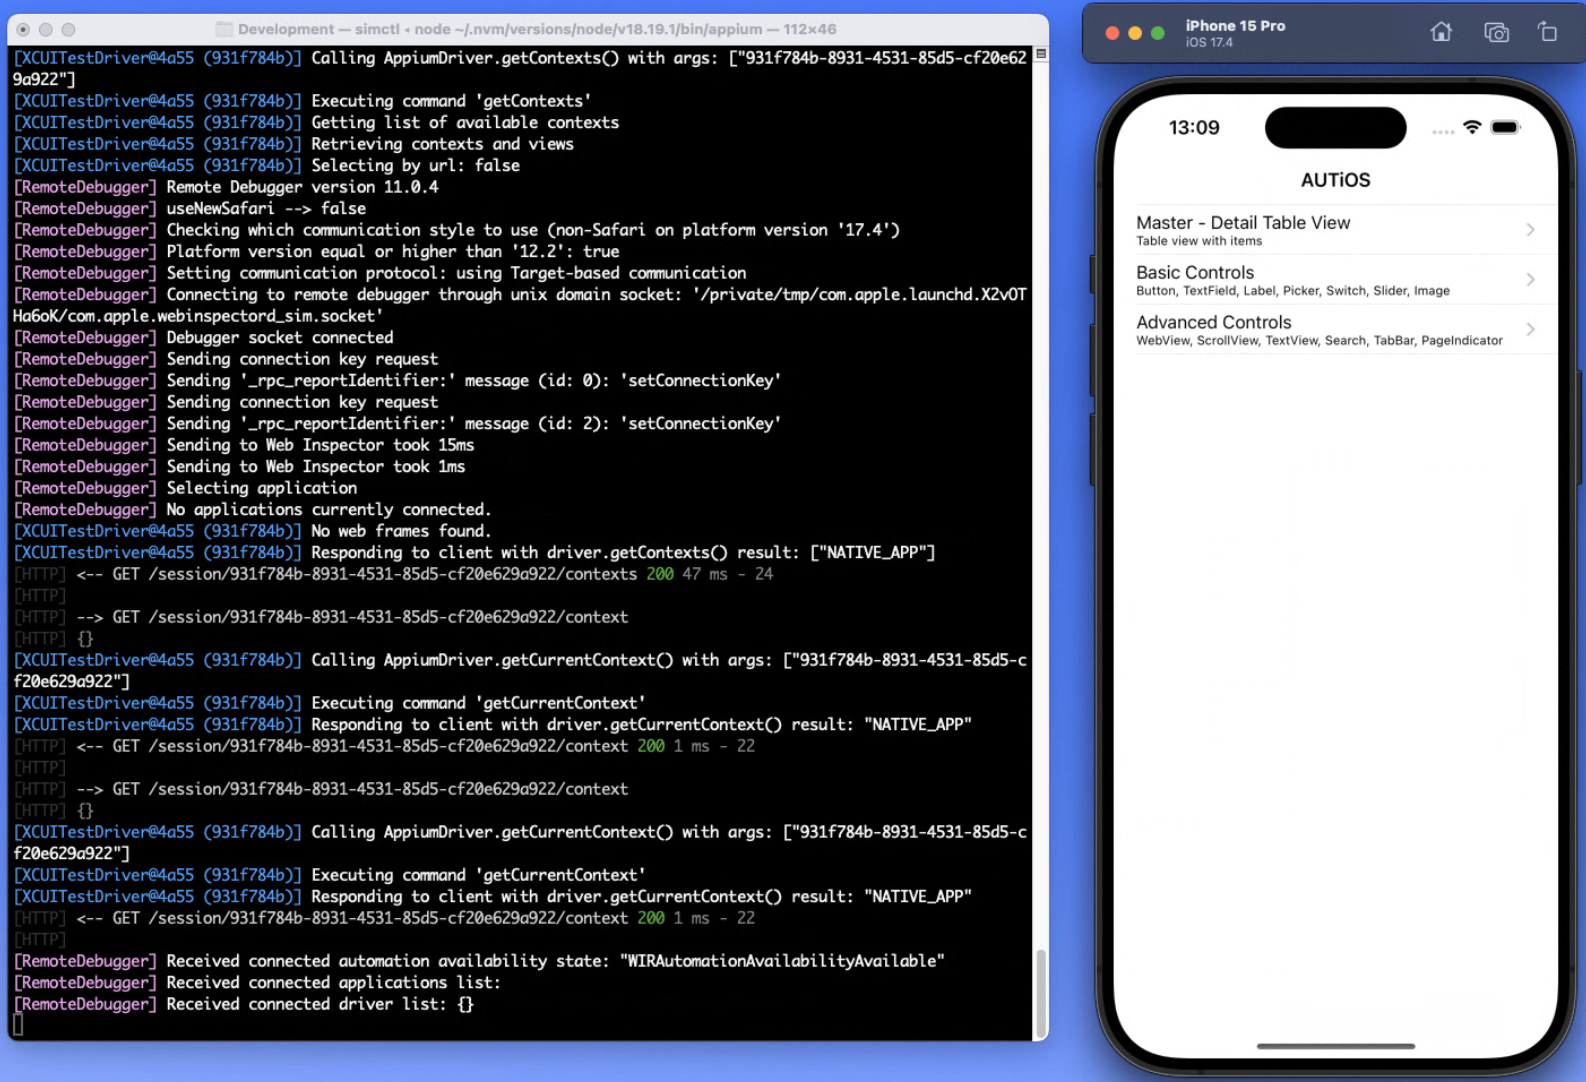
In the Mobile Spy you will see the application as well.
Real Devices
https://appium.github.io/appium-xcuitest-driver/latest/preparation/
Enable Developer Mode
https://developer.apple.com/documentation/xcode/enabling-developer-mode-on-a-device
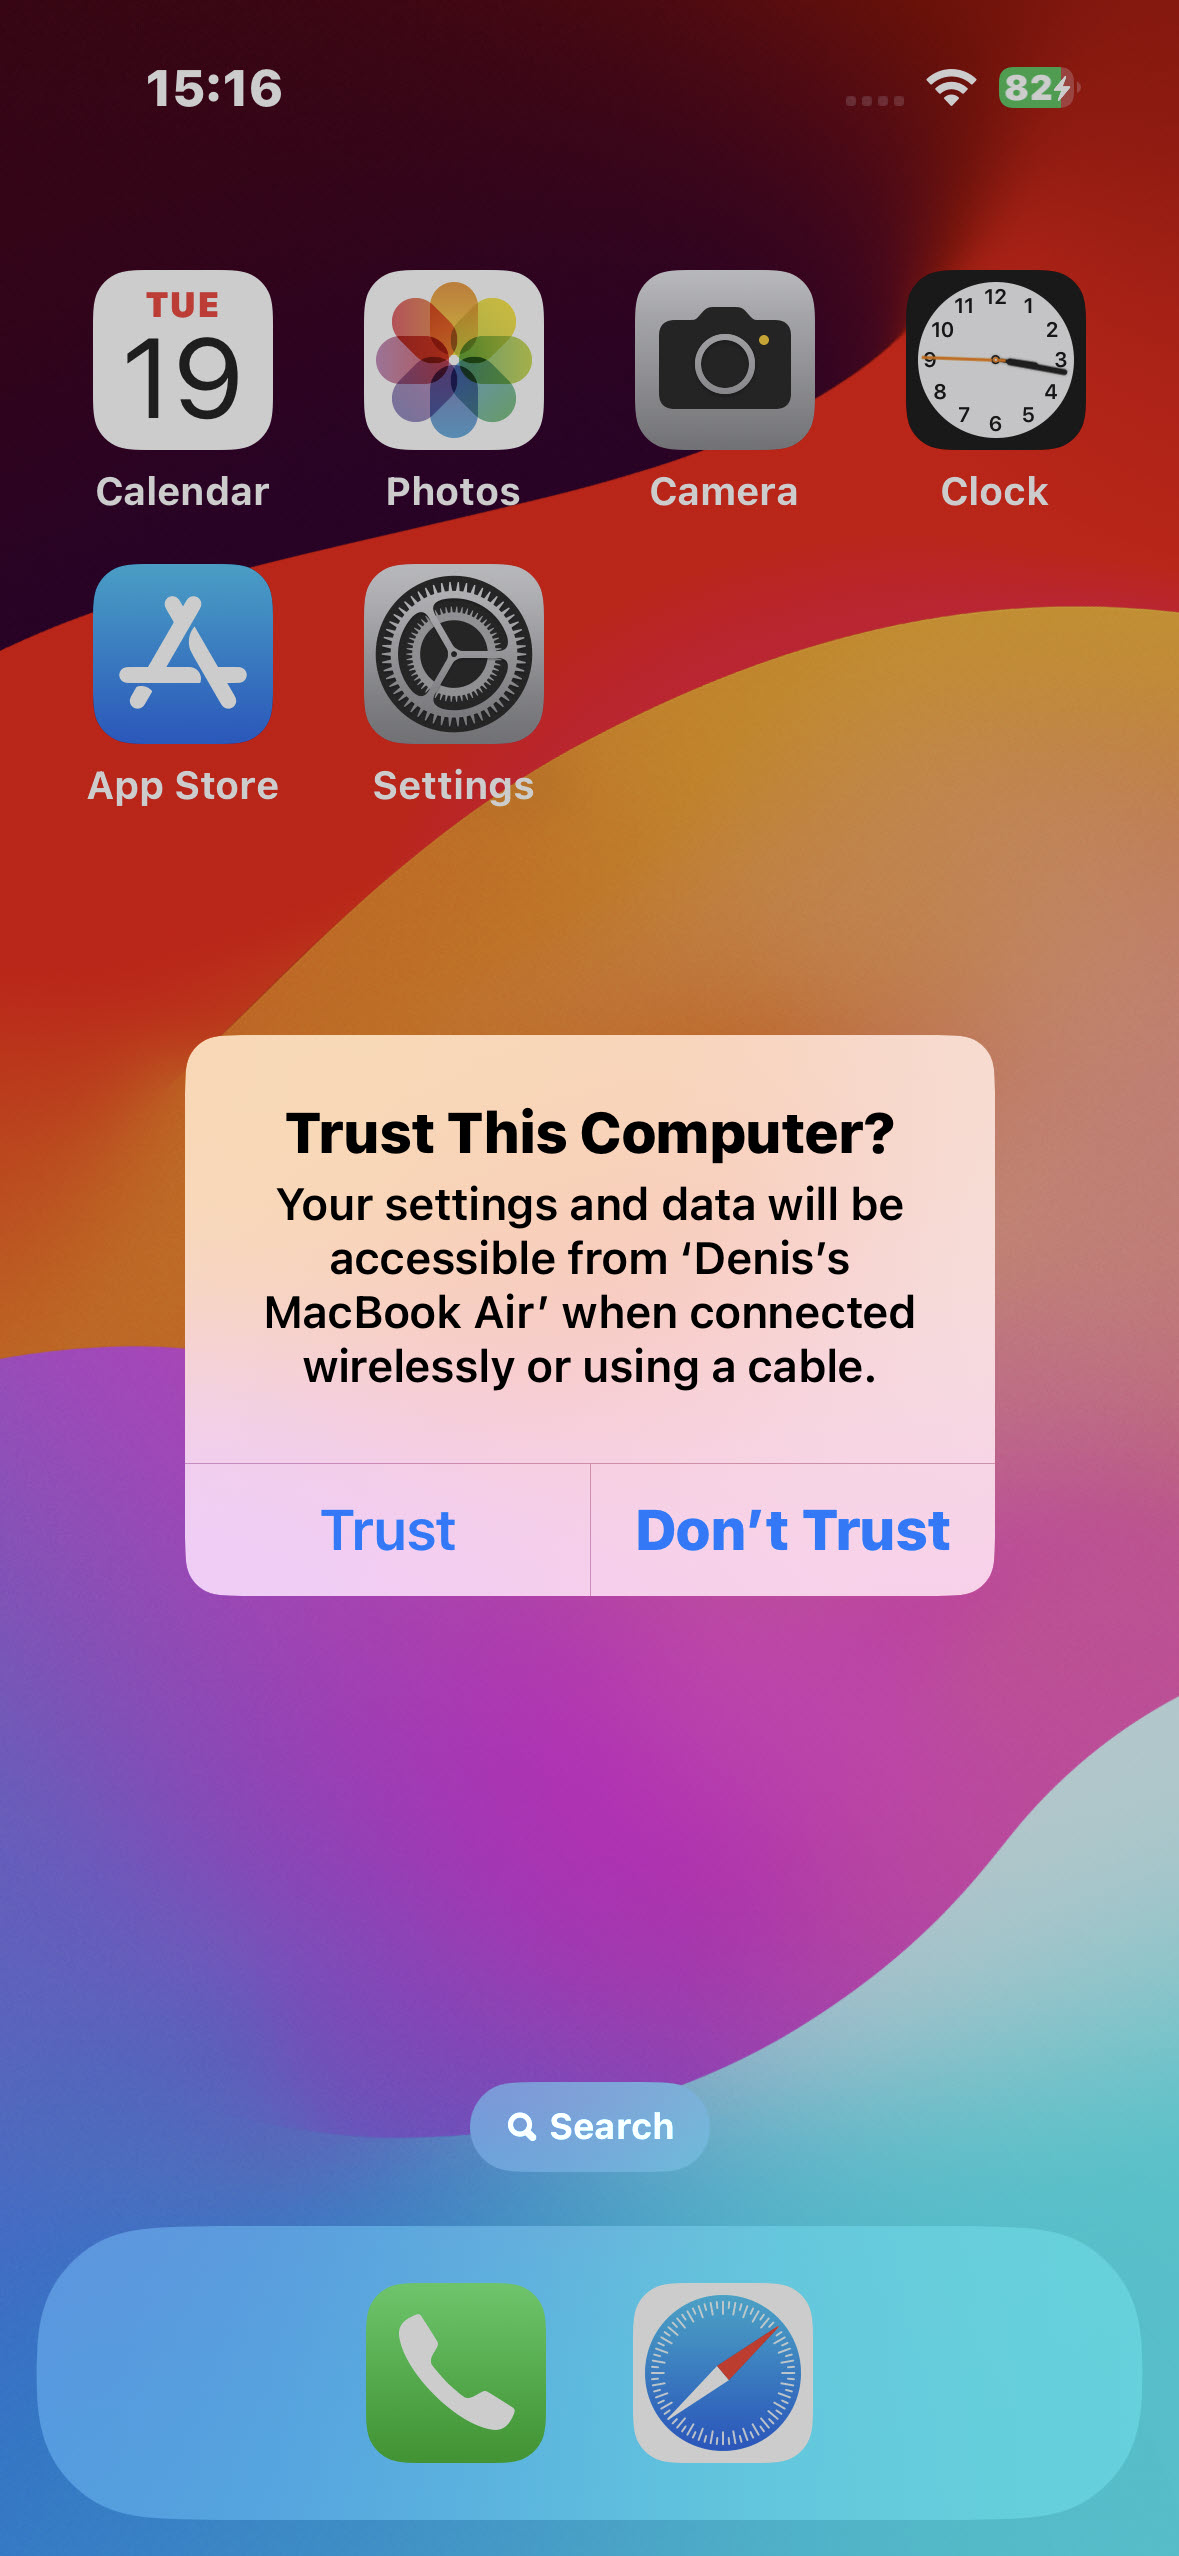
Connect the device to your macOS machine and tap Trust on the device screen.
Next go to Settings > Privacy & Security, scroll to the very bottom and tap Developer Mode.
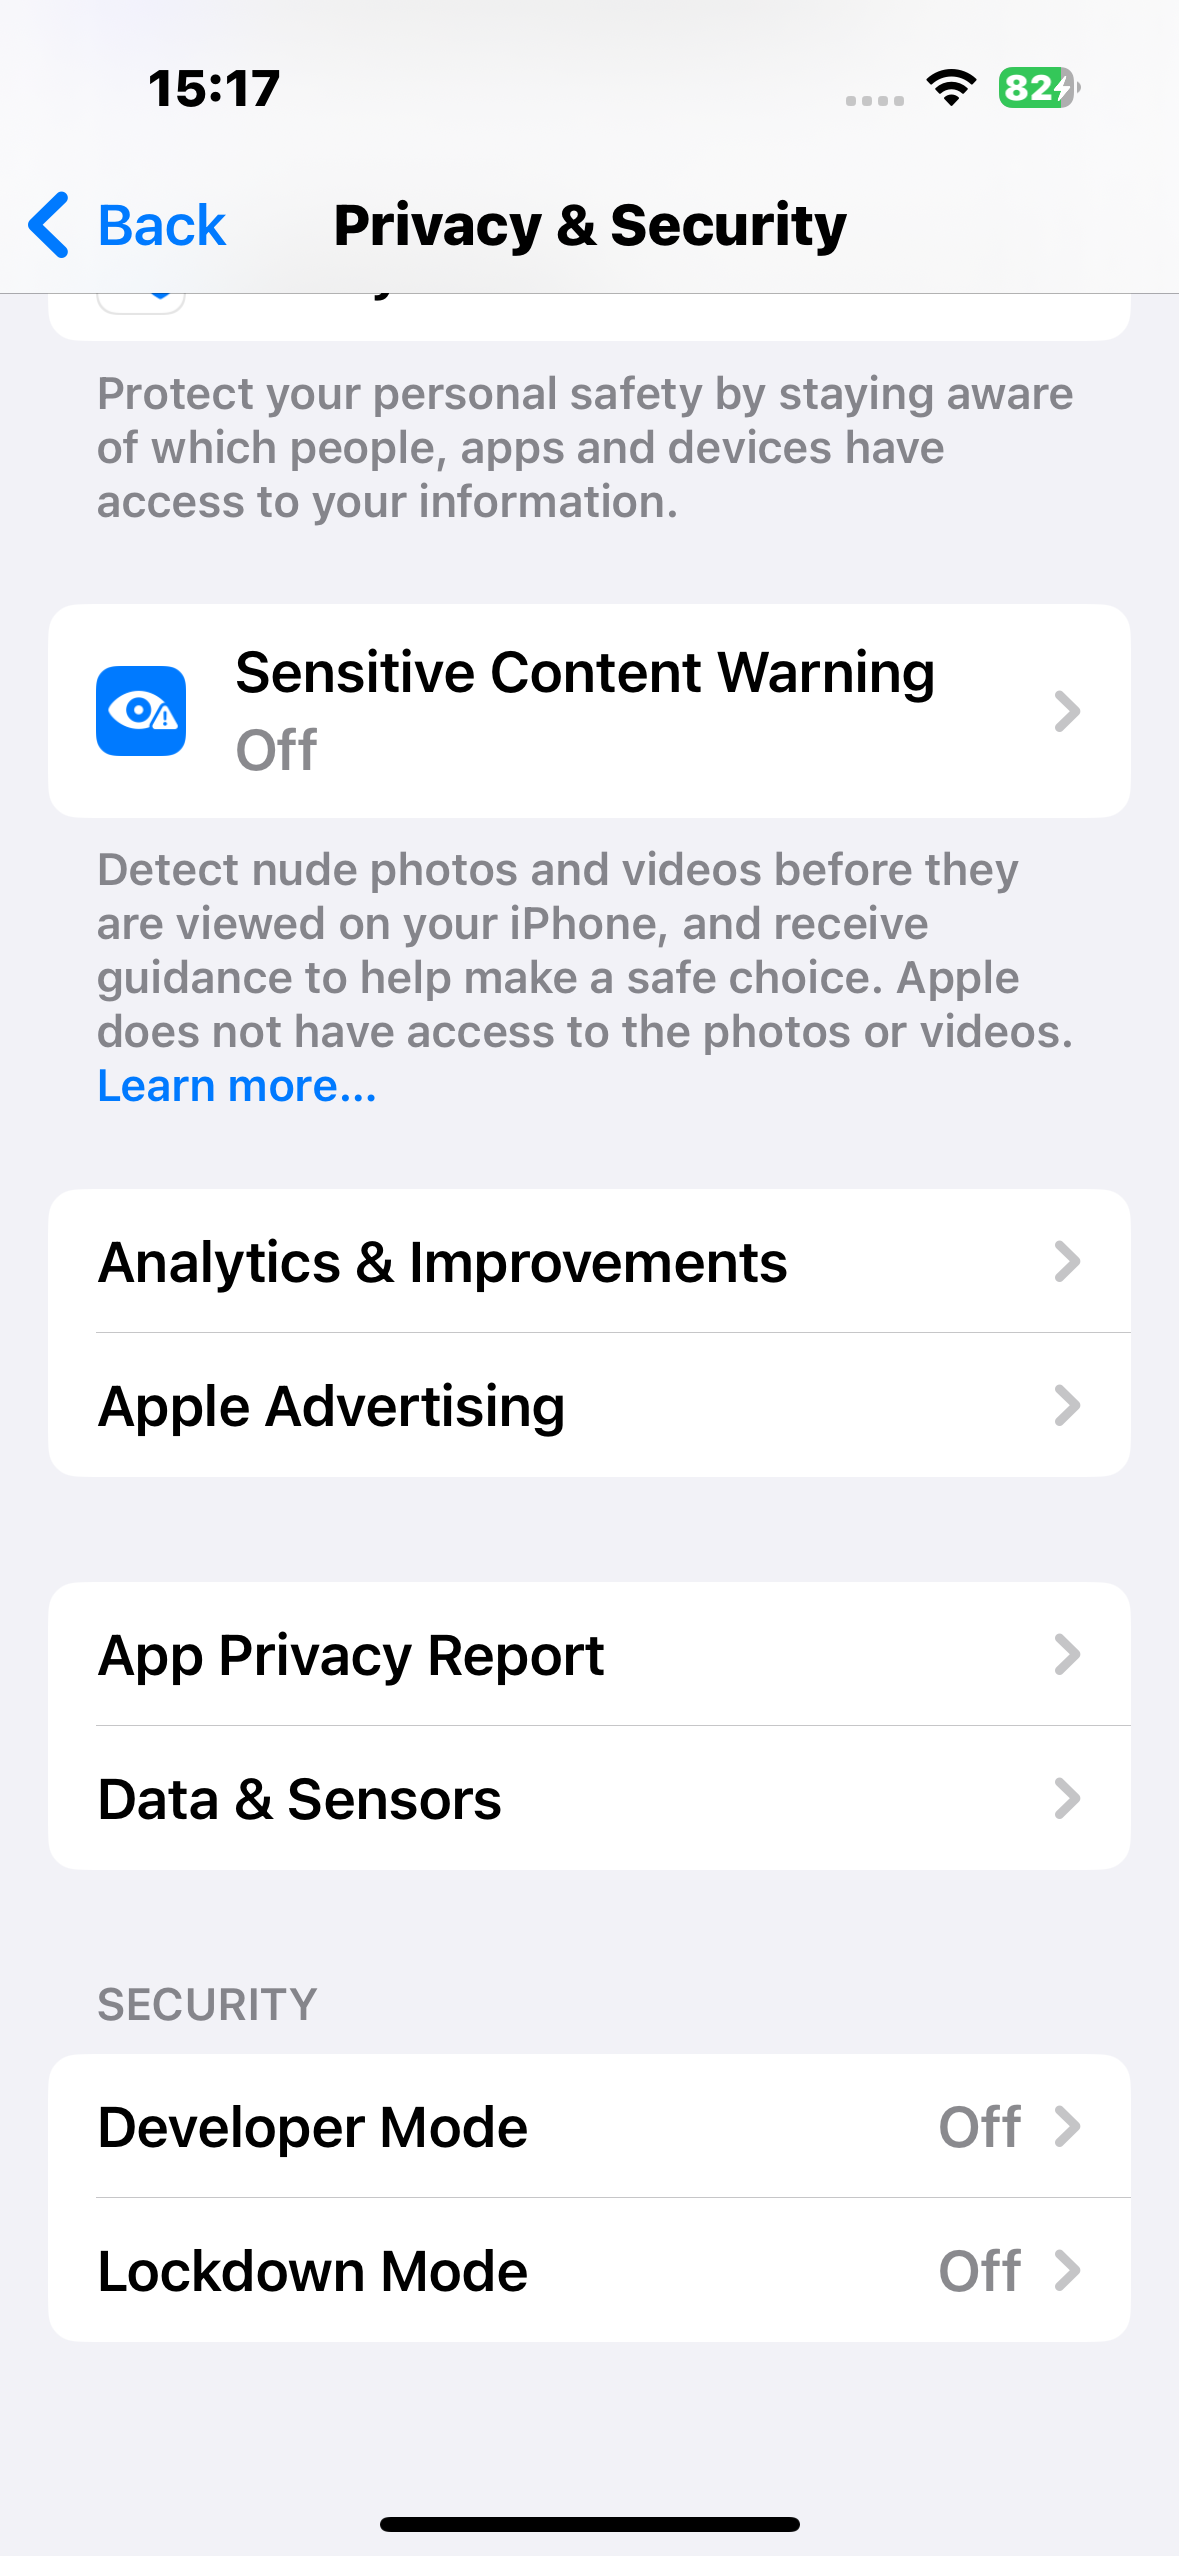
Switch on Developer Mode and tap Restart.

After reboot tap Turn On to confirm your choice.

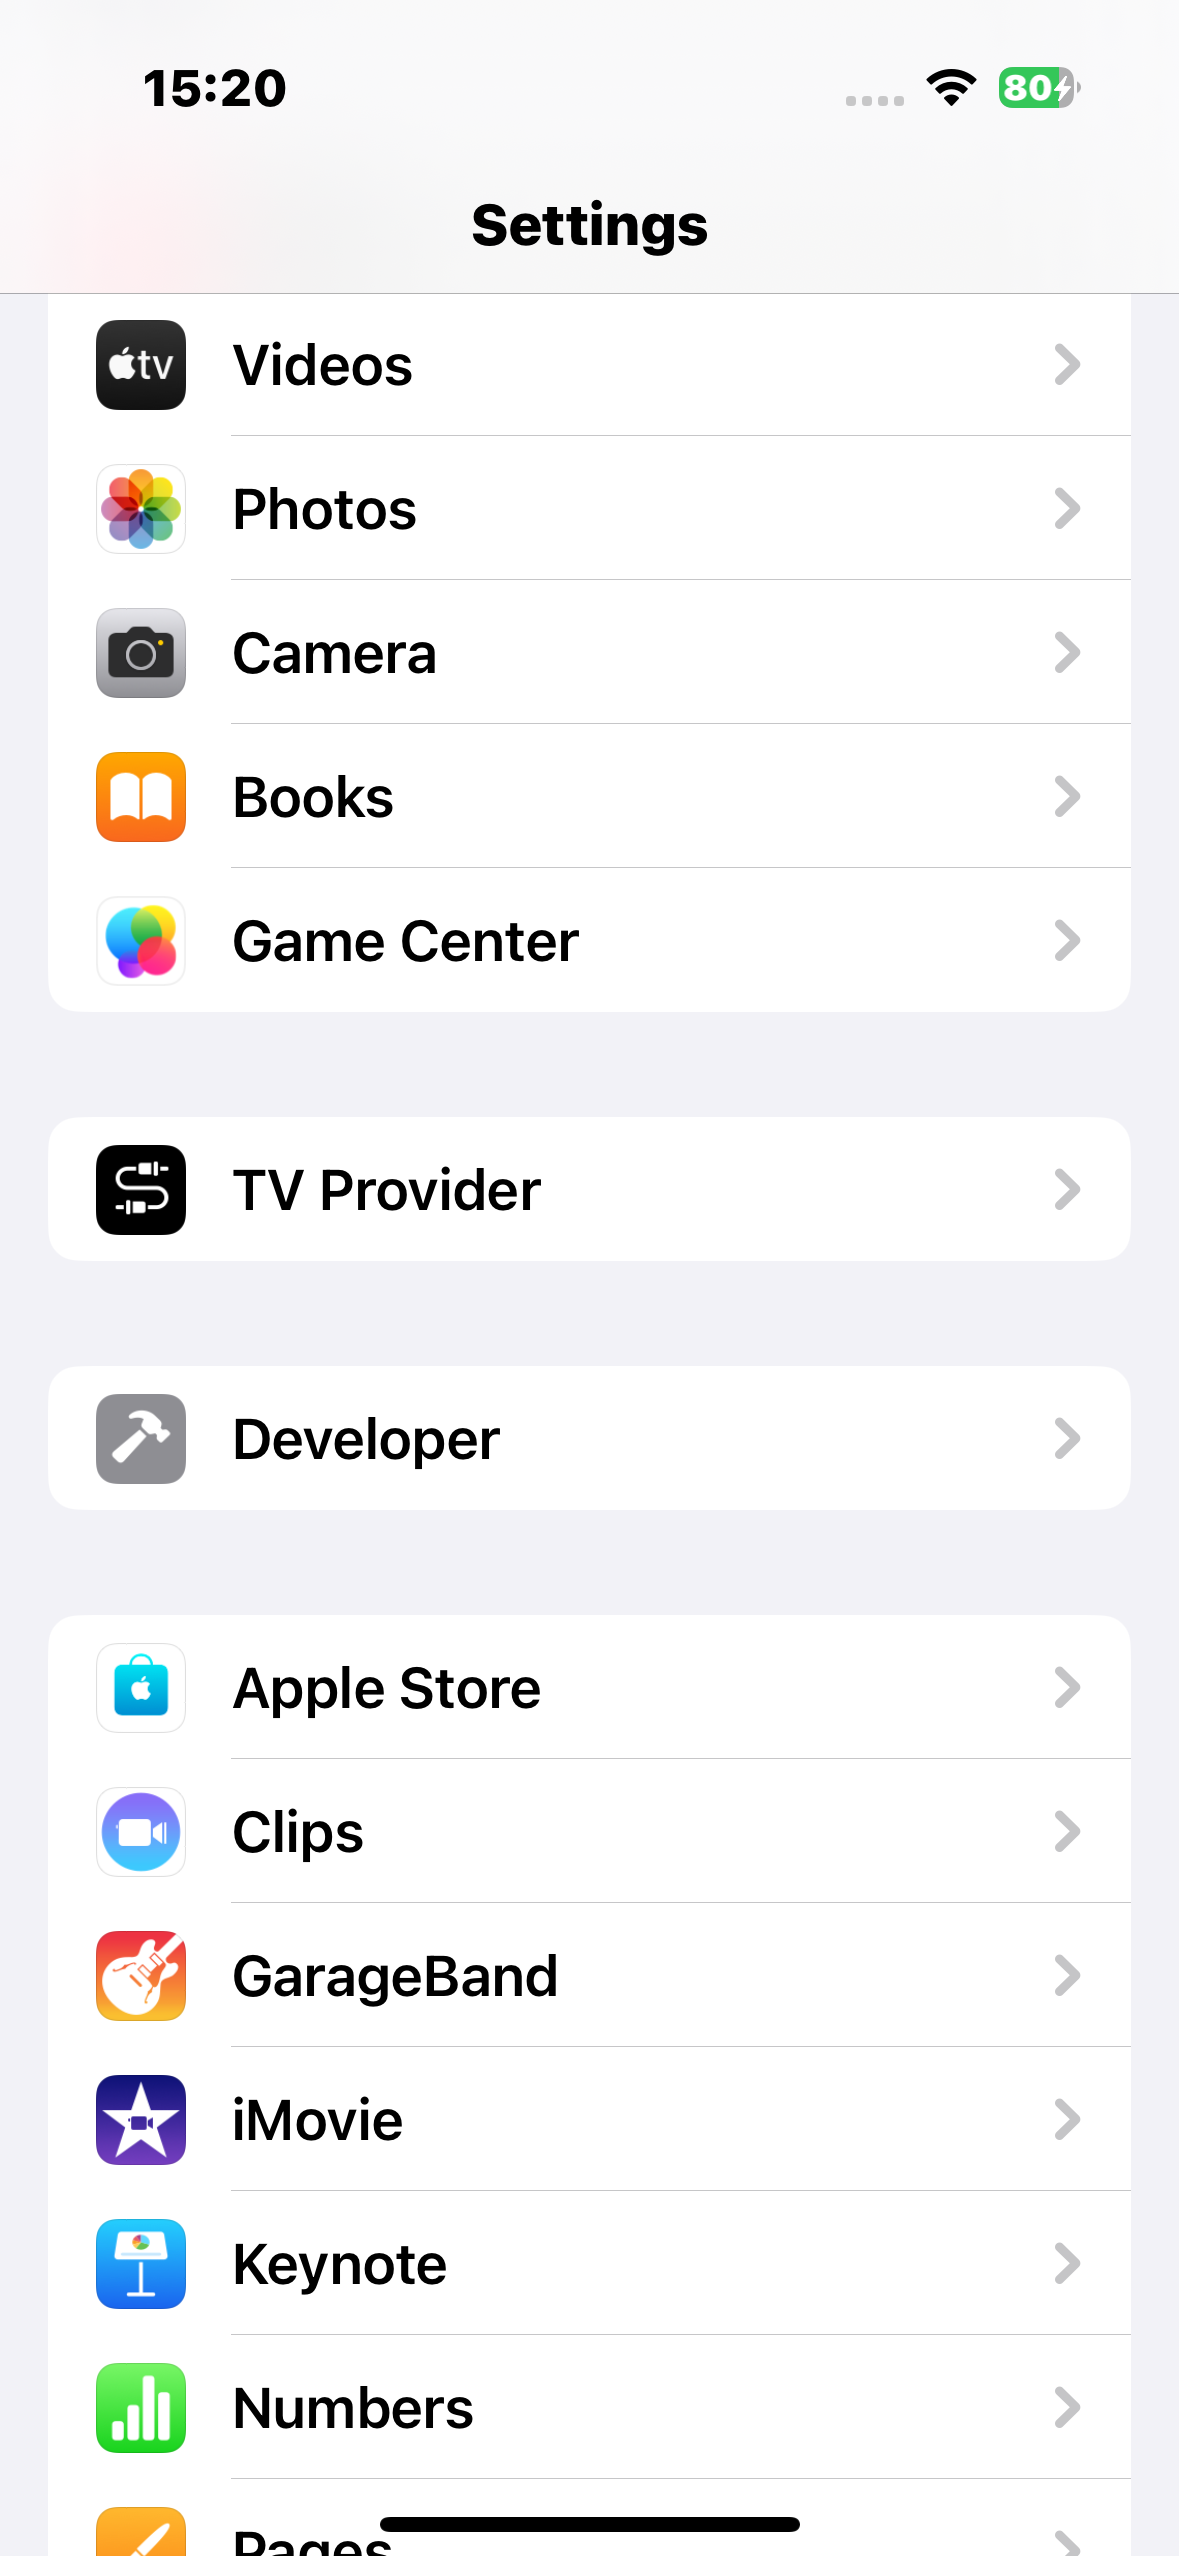
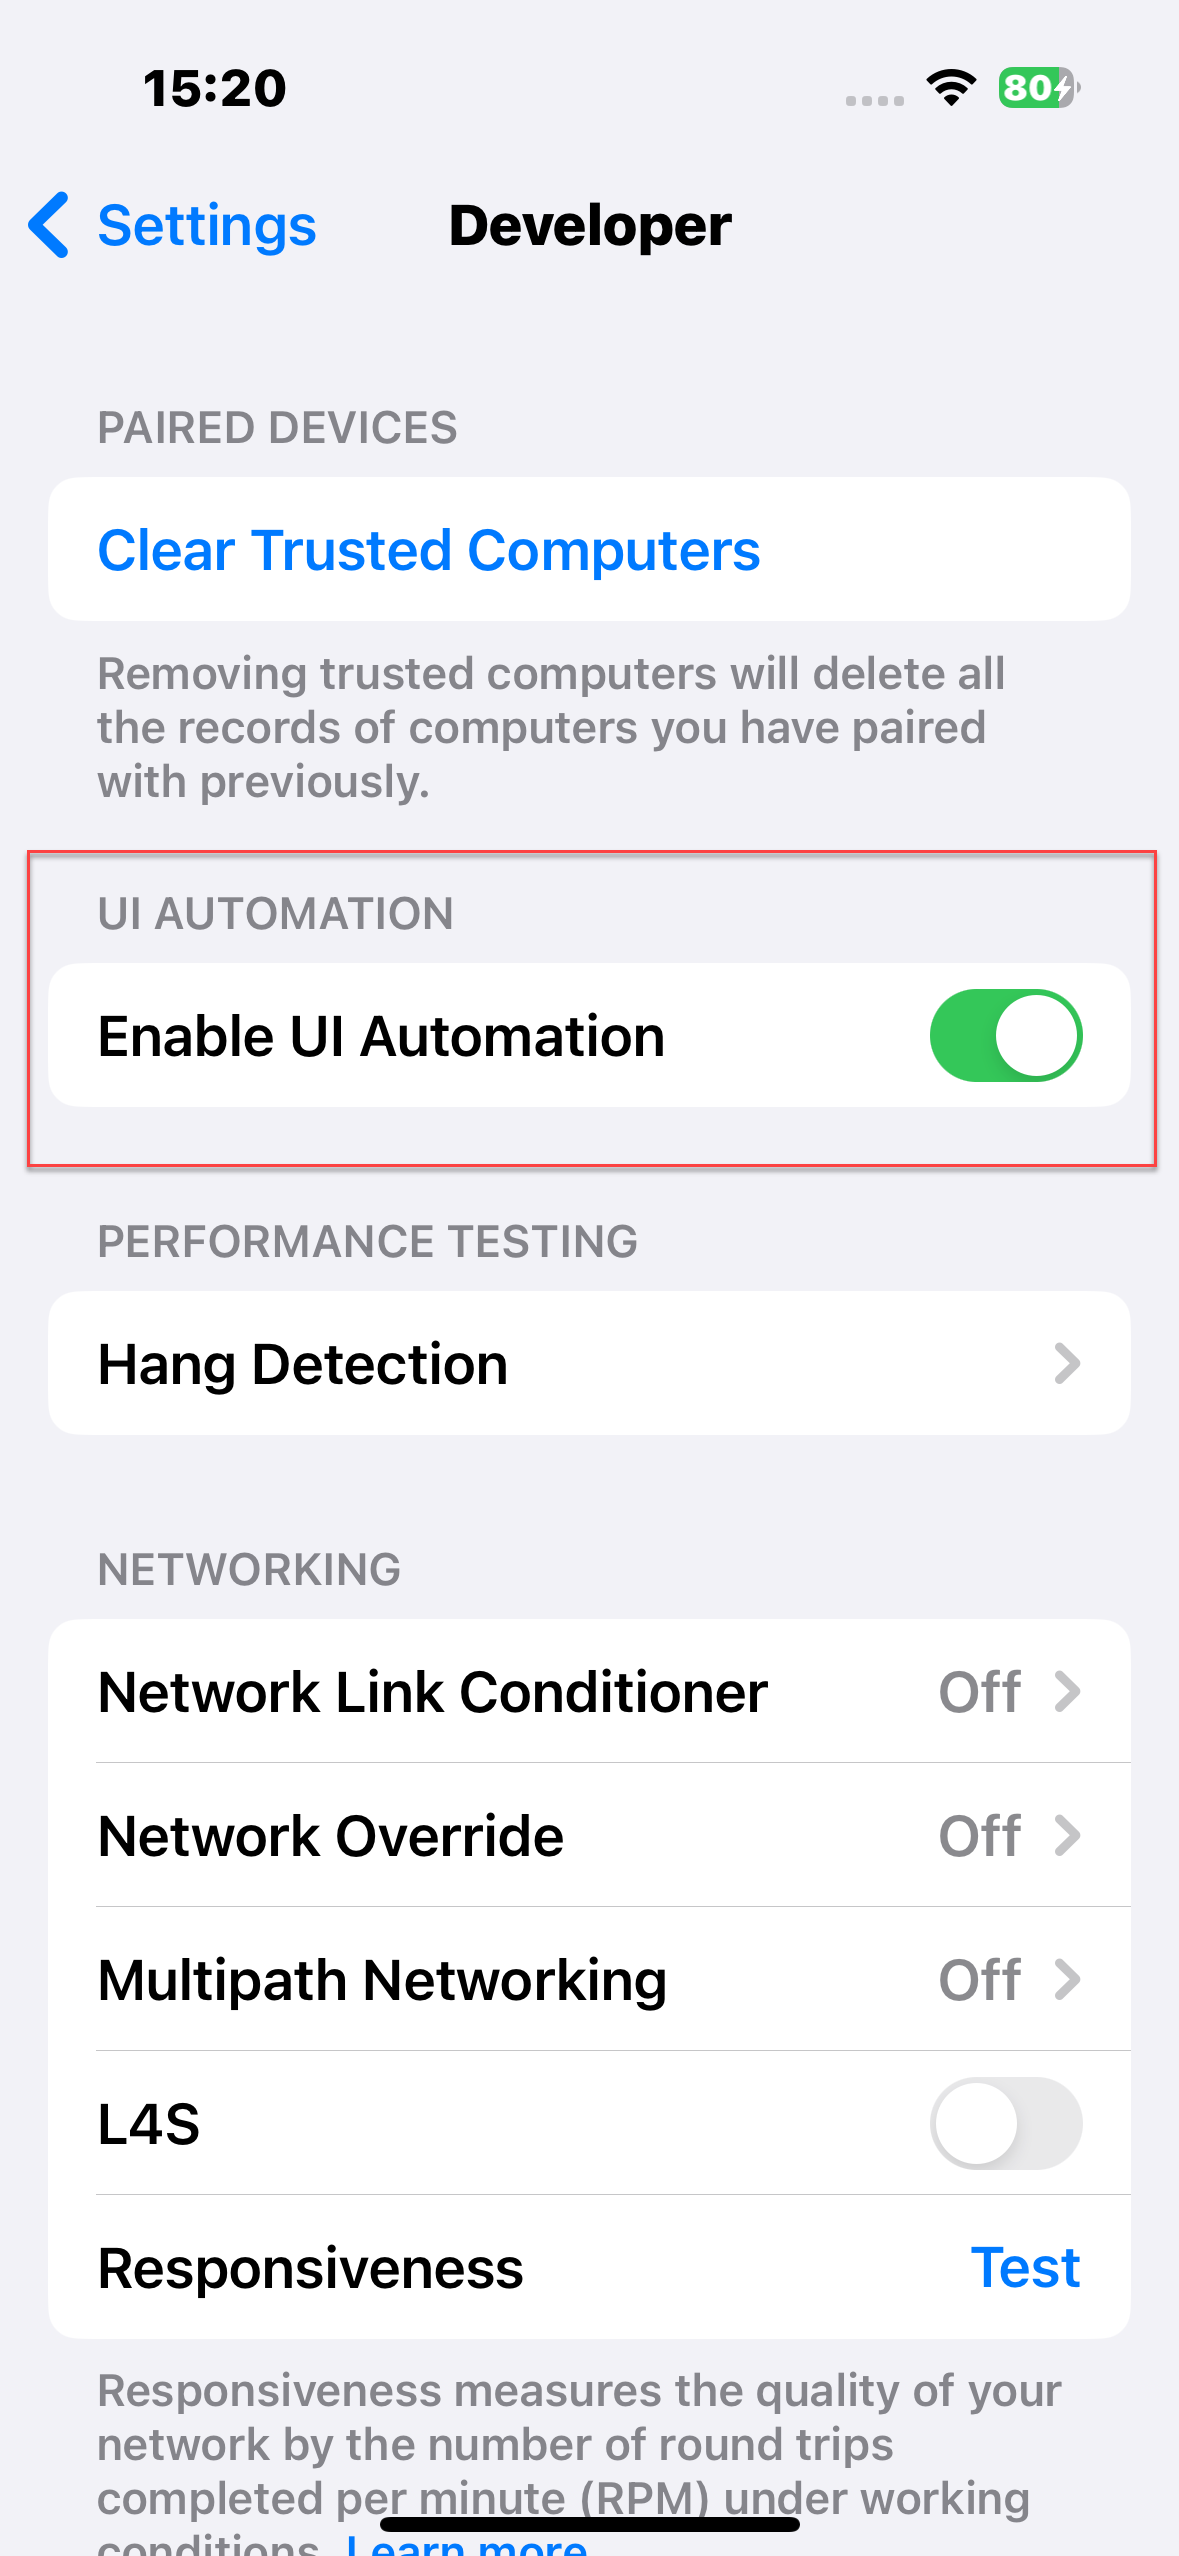
Then go to Settings > Developer.
Enable UI Automation.
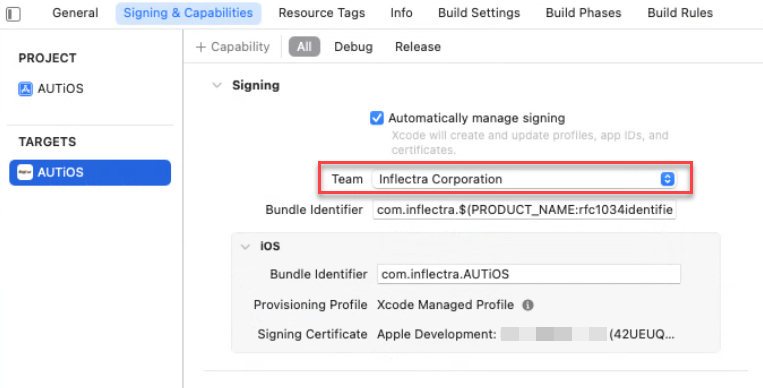
Configure Application Signing in Xcode
Open AUTiOS project, select AUTiOS target and switch to Signing & Capabilities section. Click Add Account... button.
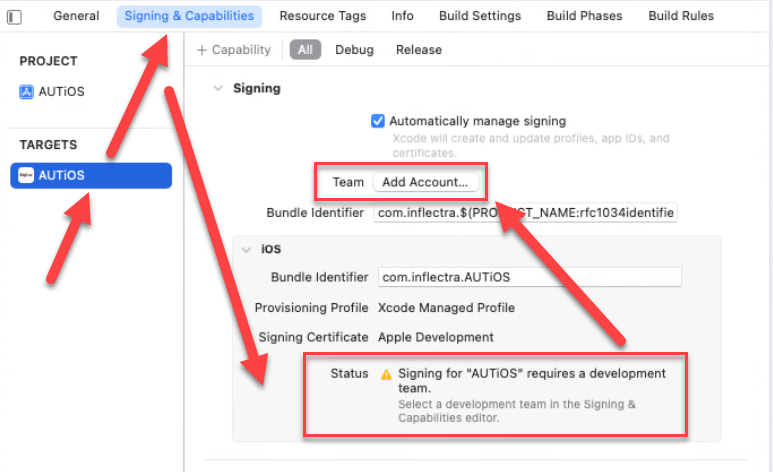
Sign-in with your Apple Developer account.
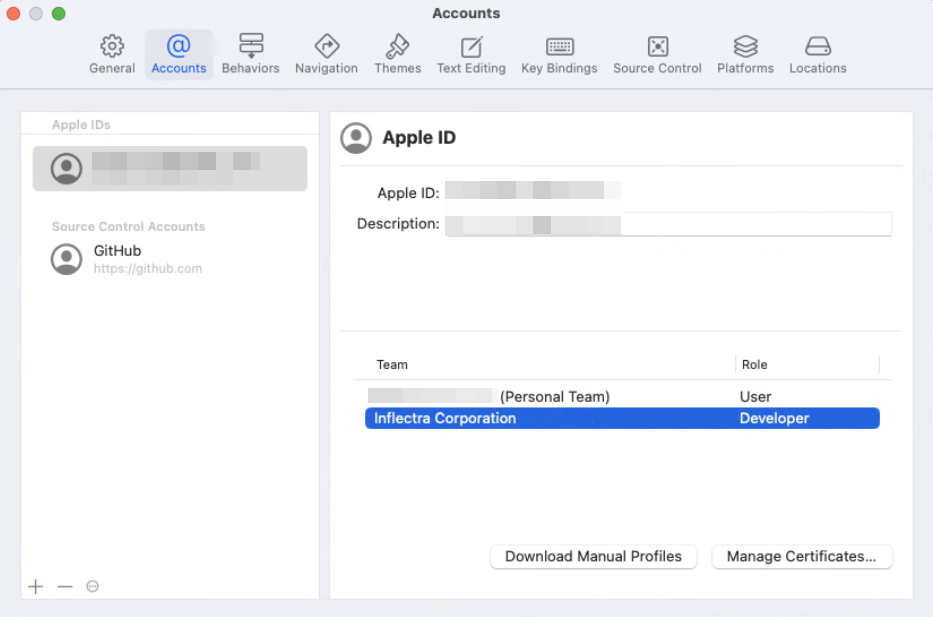
Close the dialog and choose your team.
Select your device as a run destination.
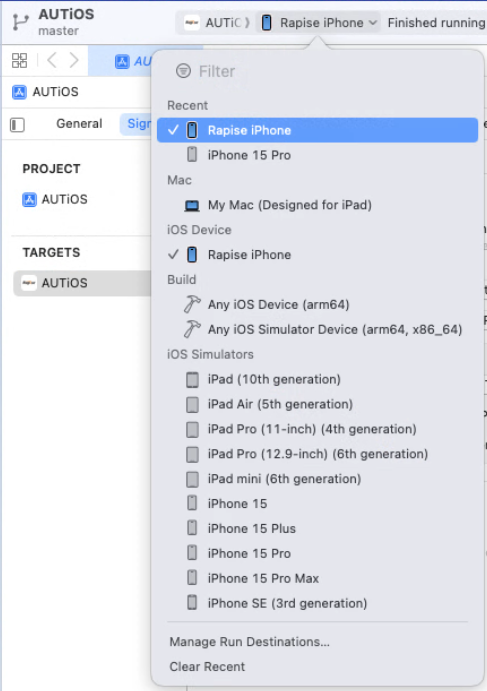
A prompt will appear, register the device.

Click run icon.

AUTiOS should appear running on the device.
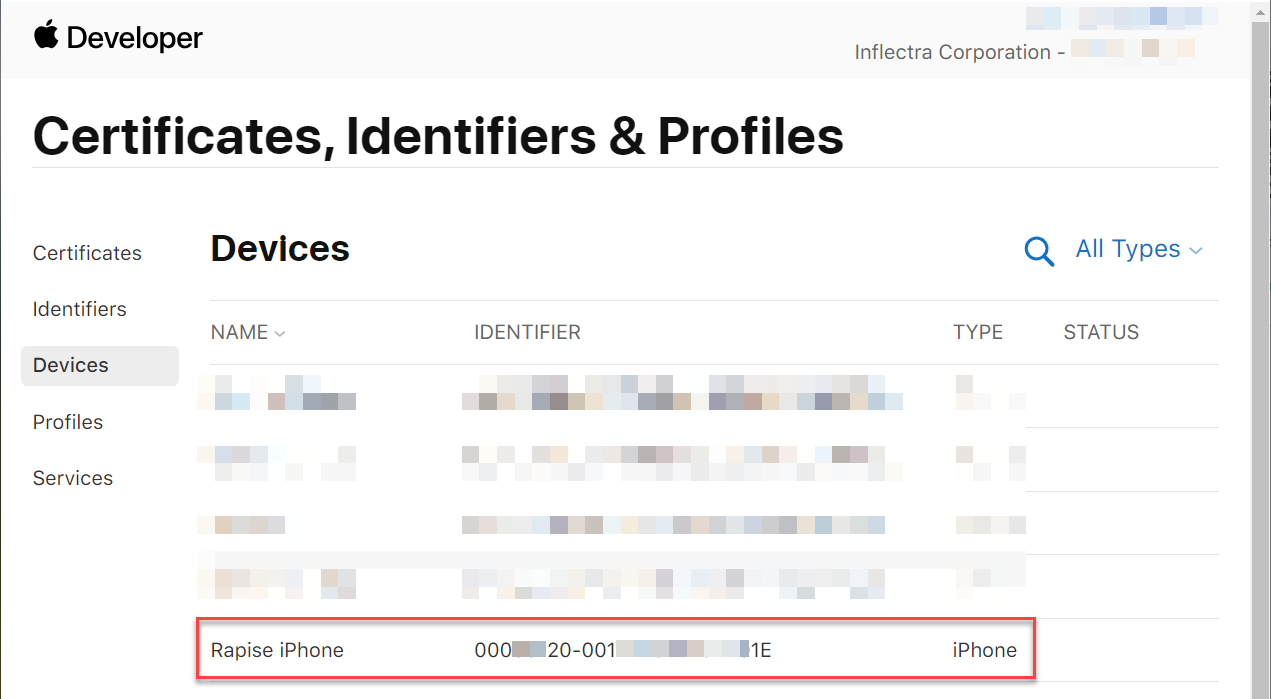
Also the device must appear in the Apple Developer account.
https://developer.apple.com/account/resources/devices/list
Connecting to Real Device from Rapise
Let's now gather all necessary information about our phone and application. The easiest way is to use Xcode (Window > Devices and Simulators).
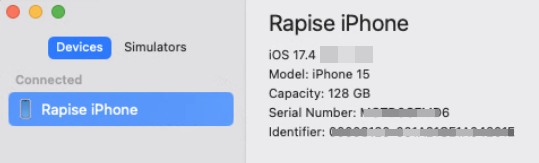
Device Name
Rapise Phone
iOS Version
17.4
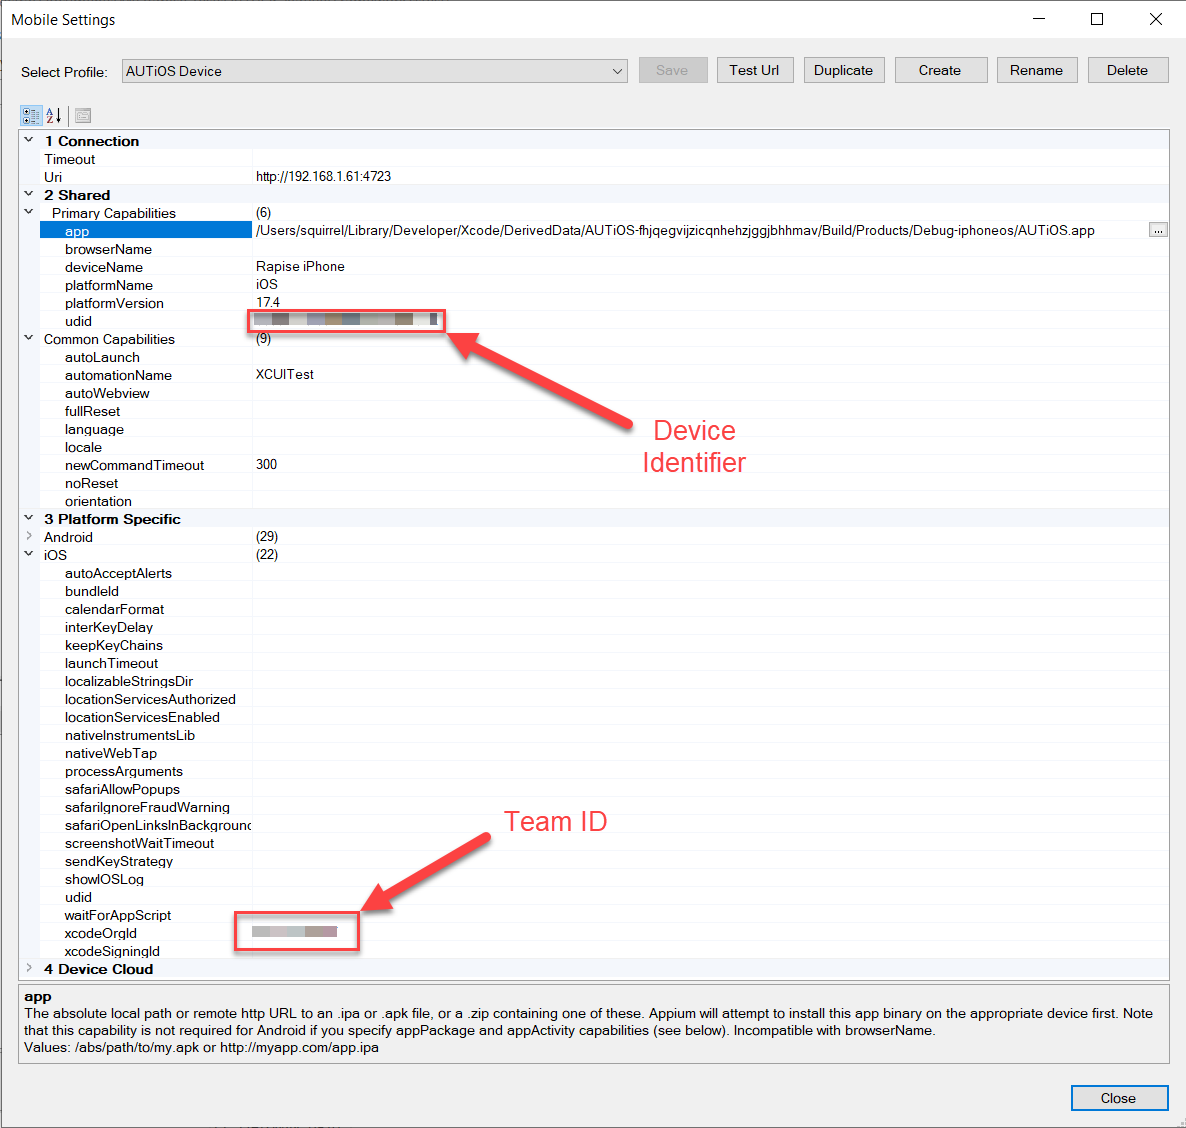
Identifier
XXXXXXXX-XXXXXXXXXXXXXXXX
Application Path
See details above (same way we found the path to the simulator build).
To get the path just drag & drop the .app file to a new terminal window.

Copy the value and transfer to the machine where Rapise is installed.
/Users/squirrel/Library/Developer/Xcode/DerivedData/AUTiOS-fhjqegvijzicqnhehzjggjbhhmav/Build/Products/Debug-iphoneos/AUTiOS.app
This time (compared to Simulator-based profile) we'll need one more parameter.
Team ID
It is displayed at the top of the Apple Developer portal.

Also you may navigate to
https://developer.apple.com/account
scroll to Membership area and find the ID there.

Let's configure the mobile profile in Rapise.
Launch Appium and connect with the Mobile Spy (same way as with Simulator, see above).
First time you'll do it watch the macOS machine. It will show a few prompts to allow access to the signing certificate bound to the Team ID. You'll need to enter password and click Allow. You may need to do it a few times.
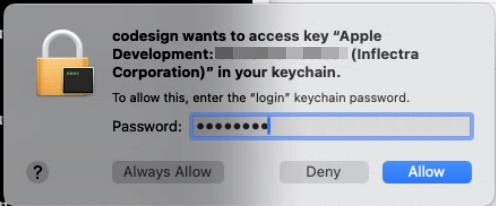
Then Appium should launch the application and Rapise display the details in the Mobile Spy.