Creating the Custom Report
This article assumes you are familiar with the basics of writing custom reports in Spira.
In this example we will be using a custom report with a custom SQL section.
To create the report you need to:
- Go to Administration > Edit Reports
- Create a new Report
- Specify that it should allow generation in MS-Word, Excel, HTML and PDF formats
- Choose to add a Custom Section:

- Then click [Save] twice and you can run your report.
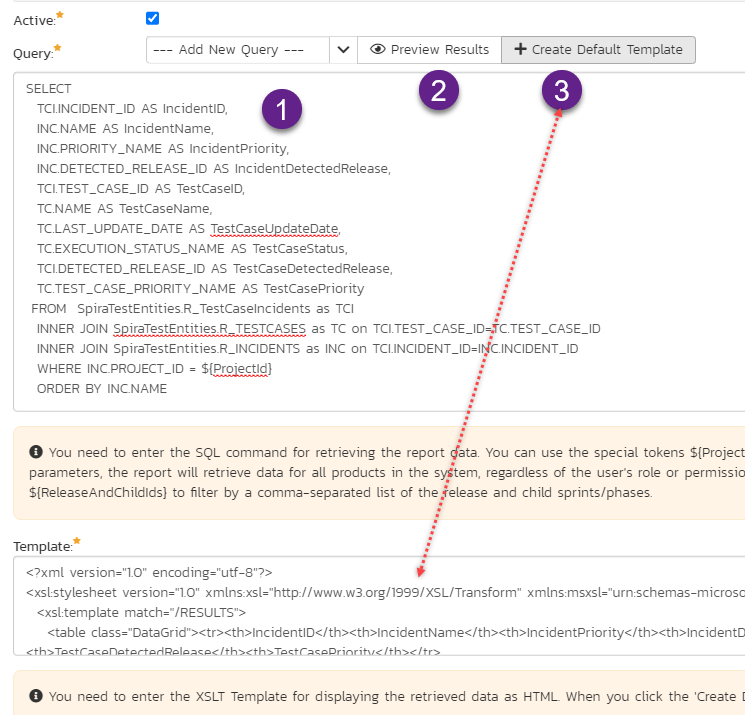
Step1.
Paste into the Query section information below:
(Feel free to change the columns in SELECT statement upon need, do not forget to regenerate the Default Template after).
SELECT
  TCI.INCIDENT_ID AS IncidentID,
  INC.NAME AS IncidentName,
  INC.PRIORITY_NAME AS IncidentPriority,
  INC.DETECTED_RELEASE_ID AS IncidentDetectedRelease,
  TCI.TEST_CASE_ID AS TestCaseID,
  TC.NAME AS TestCaseName,
  TC.LAST_UPDATE_DATE AS TestCaseUpdateDate,
  TC.EXECUTION_STATUS_NAME AS TestCaseStatus,
  TCI.DETECTED_RELEASE_ID AS TestCaseDetectedRelease,
  TC.TEST_CASE_PRIORITY_NAME AS TestCasePriority
 FROM  SpiraTestEntities.R_TestCaseIncidents as TCI
  INNER JOIN SpiraTestEntities.R_TESTCASES as TC on TCI.TEST_CASE_ID=TC.TEST_CASE_ID
  INNER JOIN SpiraTestEntities.R_INCIDENTS as INC on TCI.INCIDENT_ID=INC.INCIDENT_ID
  WHERE INC.PROJECT_ID = ${ProjectId}
  ORDER BY INC.NAME
Step 2.
Click on Create a Default Template:
Or copy the generated template into that section from below:
<?xml version="1.0" encoding="utf-8"?>
<xsl:stylesheet version="1.0" xmlns:xsl="http://www.w3.org/1999/XSL/Transform"
xmlns:msxsl="urn:schemas-microsoft-com:xslt" exclude-result-prefixes="msxsl">
  <xsl:template match="/RESULTS">
    <table class="DataGrid">
<tr>
<th>IncidentID</th>
<th>IncidentName</th>
<th>IncidentPriority</th>
<th>IncidentDetectedRelease</th>
<th>TestCaseID</th>
<th>TestCaseName</th>
<th>TestCaseUpdateDate</th>
<th>TestCaseStatus</th>
<th>TestCaseDetectedRelease</th>
<th>TestCasePriority</th>
</tr>
      <xsl:for-each select="ROW">
        <tr><td><xsl:value-of select="IncidentID"/>
</td>
<td>
<xsl:value-of select="IncidentName"/>
</td>
<td><xsl:value-of select="IncidentPriority"/>
</td><td><xsl:value-of select="IncidentDetectedRelease"/></td>
<td><xsl:value-of select="TestCaseID"/></td><td><xsl:value-of select="TestCaseName"/>
</td>
<td><xsl:value-of select="TestCaseUpdateDate"/></td><td><xsl:value-of select="TestCaseStatus"/>
</td>
<td><xsl:value-of select="TestCaseDetectedRelease"/></td>
<td><xsl:value-of select="TestCasePriority"/></td>
        </tr>
      </xsl:for-each>
        </table>
    </xsl:template>
</xsl:stylesheet>
Step 3.
Template gets generated and click Save.
Once that is done, you are ready to run your report.
Running the Custom Report
To run the report and generate a program-level RTM, go to the main Reports screen and execute your report:

Now when you run the report (for example in XLS or MS-Excel format) you will see this:
