Create a report:
This article assumes you are familiar with the basics of writing custom reports in Spira.
In this example we will build a custom report with custom ESQL section.
To create the report you need to:
- Go to Administration > Edit Reports
- Click on Create a new Report (at the bottom of the list of existing Reports)
- Specify that it should allow generation in HTML format (the dynamic elements won't work in Word/PDF/Excel)
- Choose to add a Custom Section:

SQL Query:
5. Click Add New Custom Section and then
6. Copy and paste the below query into the Query section of the window displayed:
SELECT INC.INCIDENT_ID, INC.NAME AS NAME, INC.PRIORITY_NAME AS PRIORITY, INC.INCIDENT_STATUS_NAME AS STATUS
FROM SpiraTestEntities.R_Incidents as INC where INC.PROJECT_ID = ${ProjectId}
Query explanation:
SELECT statement extracts some fields from the Incidents custom reports view, like IncidentID, Incident Name, its status and priority.
We're using a custom alias INC so to add some clarity when querying.
WHERE statement specifies the active project the report center was accessed from.
7. If you will click on Generate Default Template button then, you will get a plain report with a table with data pulled: it will be a list of incidents, with four columns: IncidentID, Incident Name, its status and priority.
In this case, we need to get a dynamic table that displays these columns only for the incident selected from the dropdown.
So, the template you should copy is here:
<xsl:stylesheet version="1.0" xmlns:xsl="http://www.w3.org/1999/XSL/Transform" xmlns:msxsl="urn:schemas-microsoft-com:xslt" exclude-result-prefixes="msxsl">
  <xsl:template match="/RESULTS">
    <html>
      <head>
        <title>Incident Report</title>
      </head>
      <body>
        <h1>Incident Report</h1>
        <p>Select an incident from the list:</p>
        <select id="incident-list">
          <option value="">-- Select an Incident --</option>
          <xsl:for-each select="ROW">
<option
    value="{INCIDENT_ID}"
    data-name="{NAME}"
    data-priority="{PRIORITY}"
    data-status="{STATUS}">
  <xsl:value-of select="NAME"/>
</option>
          </xsl:for-each>
        </select>
        <div id="details-container"></div>
        <script>
const dropdown = document.getElementById('incident-list');
const detailsContainer = document.getElementById('details-container');

dropdown.addEventListener('change', function() {
  const selectedOption = this.options[this.selectedIndex];
  if (selectedOption.value) {
    const incidentName = selectedOption.getAttribute('data-name');
    const incidentPriority = selectedOption.getAttribute('data-priority');
    const incidentStatus = selectedOption.getAttribute('data-status');
    const outputTable = `
      <table border="1" style="width:100%; border-collapse: collapse; margin-top: 20px;">
        <thead style="background-color: #f2d2c2;">
          <tr>
            <th>Name</th>
            <th>Priority</th>
            <th>Status</th>
          </tr>
        </thead>
        <tbody>
          <tr>
            <td>${incidentName}</td>
            <td>${incidentPriority}</td>
            <td>${incidentStatus}</td>
          </tr>
        </tbody>
      </table>
    `;
    detailsContainer.innerHTML = outputTable;
  } else {
    detailsContainer.innerHTML = '';
  }
});
        </script>
      </body>
    </html>
  </xsl:template>
</xsl:stylesheet>
Explanation of XSLT-part of the code
The XSLT portion of the code is responsible for pre-populating the HTML document with data:
<xsl:stylesheet version="1.0" xmlns:xsl="http://www.w3.org/1999/XSL/Transform" xmlns:msxsl="urn:schemas-microsoft-com:xslt" exclude-result-prefixes="msxsl">
  <xsl:template match="/RESULTS">
    <html>
      <head>
        <title>Incident Report</title>
      </head>
      <body>
        <h1>Incident Report</h1>
        <p>Select an incident from the list:</p>

        <select id="incident-list">
          <option value="">-- Select an Incident --</option>
          <xsl:for-each select="ROW">
<option
    value="{INCIDENT_ID}"
    data-name="{NAME}"
    data-priority="{PRIORITY}"
    data-status="{STATUS}">
  <xsl:value-of select="NAME"/>
</option>
          </xsl:for-each>
        </select>
        <div id="details-container"></div>
<script>
--- JAVASCRIPT GOES HERE
</script>
   </body>
  </html>
 </xsl:template>
</xsl:stylesheet>
- XML data <xsl:for-each select="ROW"> generates a <select> dropdown menu.
- Tag <option> with data attributes (data-name, data-priority, data-status) that stores the incident's details, to embeds all the necessary information directly into the HTML on the server, prior sending the file to the browser. So, now its a variables to pass the parameter next, to JavaScript.
- Placeholder <div> with the ID details-container
Explanation of the JavaScript part of the code:
The JavaScript provides the interactive functionality here and makes this report dynamic:
const dropdown = document.getElementById('incident-list');
const detailsContainer = document.getElementById('details-container');
dropdown.addEventListener('change', function() {
const selectedOption = this.options[this.selectedIndex];
  if (selectedOption.value) {
    const incidentName = selectedOption.getAttribute('data-name');
    const incidentPriority = selectedOption.getAttribute('data-priority');
    const incidentStatus = selectedOption.getAttribute('data-status');
    const outputTable = `
      <table border="1" style="width:100%; border-collapse: collapse; margin-top: 20px;">
        <thead style="background-color: #f2d2c2;">
          <tr>
            <th>Name</th>
            <th>Priority</th>
            <th>Status</th>
          </tr>
        </thead>
        <tbody>
          <tr>
            <td>${incidentName}</td>
            <td>${incidentPriority}</td>
            <td>${incidentStatus}</td>
          </tr>
        </tbody>
      </table>
    `;
    detailsContainer.innerHTML = outputTable;
  } else {
    detailsContainer.innerHTML = '';
  }
});
- First, it references to the dropdown and the output container
- Then it listens for the change event on the dropdown menu.
- Next, the code makes sure a valid option was selected so to retrieve the data from the data- attributes of the selected option
- Then this information is used to dynamically generate HTML table and paste it into the details-container div, updating the page without reloading or any new browser requests
- Updates the HTML content of the container
- And finally, clears the container if the placeholder is selected
- You can modify some table parameters, so to set the static width, border size, top margin or modify first row color:
<table border="1" style="width:100%; border-collapse: collapse; margin-top: 20px;">
        <thead style="background-color: #f2d2c2;">
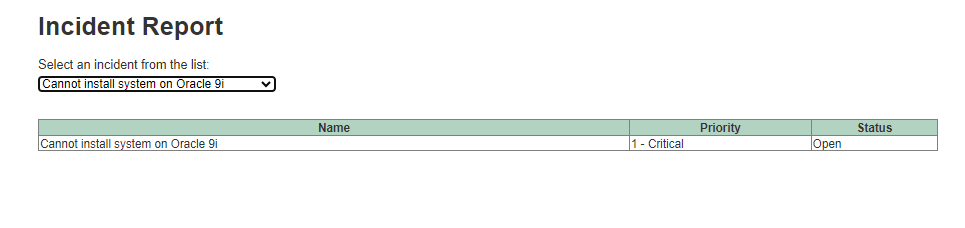
9. After that, the report is now ready for saving and running. Give the report a meaningful name and save it for further use.
10. Go to the product's report center and locate the newly created report. Click Generate and wait for the page to load. You should get something similar to this:
The table parameters used in this example are as follows:
<table border="1" style="width:1000px; border-collapse: collapse; margin-top: 30px;">
 <thead style="background-color: #b2d2c2;">