The Cause
By default, the Android Emulator uses your computer's GPU (Hardware Acceleration) to render the mobile interface smoothly. However, when you launch a resource-heavy application like a Google Meet video conference, the browser heavily utilizes the system's GPU for video encoding and decoding.
When the Android Emulator's graphics are set to "Automatic," it detects this GPU contention and silently falls back to Software Rendering (forcing your CPU to draw the screen pixel by pixel). This fallback is what causes the sudden, massive drop in performance and subsequent Rapise test failures.
The Solution
To prevent this from happening, you must force the Android Emulator to always use Hardware Acceleration.
However, Google locks the Advanced Settings (including the Graphics configuration dropdown) on any emulator system image that includes Google Play. To bypass this restriction and unlock the Graphics dropdown, you must use a Google APIs system image instead.
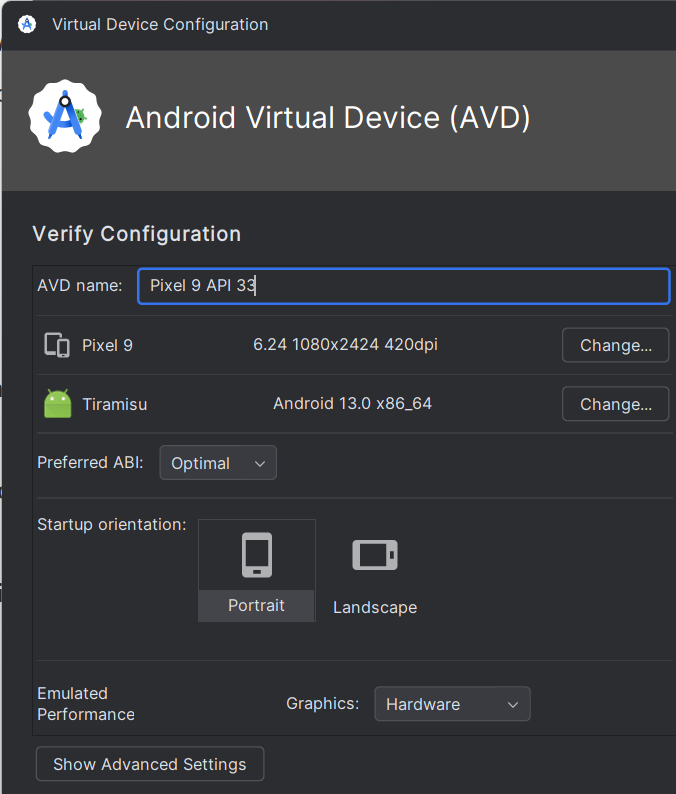
Step 1: Create a "Google APIs" Virtual Device
Open Android Studio and navigate to the Device Manager.
Click Create Device.
Select your desired hardware profile (e.g., Pixel 9).
Click Next.
In the System Image list, look at the Target column. Select a system image labeled Google APIs (e.g., Android 13.0 (Google APIs)).
Click Next to proceed to the configuration screen.
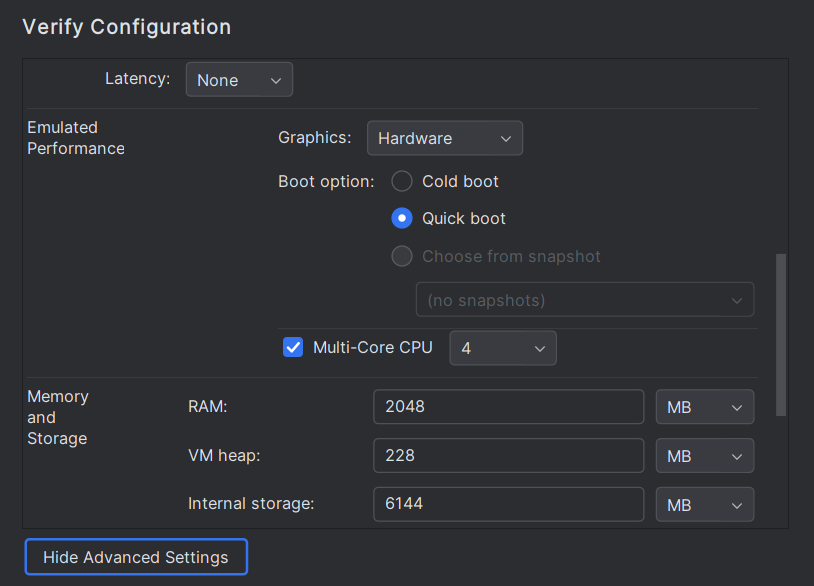
Step 2: Enable Hardware Acceleration
On the AVD configuration screen, click the Show Advanced Settings button.
Scroll down to the Emulated Performance section.
Because you selected a non-Play Store image, the Graphics dropdown will now be enabled.
Change the Graphics setting from Automatic to Hardware - GLES 2.0 (or simply Hardware).
(Optional) Under Multi-Core CPU, increase the core count to 4 to give the emulator more processing power.
Click Finish to save the device.
Step 3: Execute Rapise Tests
Launch your newly configured Android Simulator and execute your Rapise mobile tests. Because the graphics rendering is now strictly bound to your hardware, the emulator will no longer default to software rendering when Chrome (or any other application) requests GPU resources.
Your tests will now run fast and consistently, even while sharing your screen during a live meeting.