Background:
For teams working in regulated environments, proving end-to-end traceability is a critical part of compliance. You often need to demonstrate that high-level Software Requirements Specifications (SRS) successfully propagate down through your Software Architecture Documents (SAD) and your detailed Software Design Documents (SDD).
A common way to manage this in Spira is to track all three levels within the Requirements module and use the Component field to categorize them (e.g., setting the component to "Requirements," "Architecture," or "Design").
Create a report:
This article assumes you are familiar with the basics of writing custom reports in Spira.
In this example we will be using a custom report with a custom ESQL section.
To create the report you need to:
- Go to Administration > Edit Reports
- Click on Create a new Report (at the bottom of the list of existing Reports)
- Specify that it should allow generation in MS-Word, Excel, HTML and PDF formats
- Choose to add a Custom Section:

- Paste into the Query section the query itself.
SQL Query:
SELECT
  RQ.REQUIREMENT_ID,
  RQ.NAME AS REQUIREMENT_NAME,
  RQ.COMPONENT_NAME AS BASE_COMPONENT,
  LR.NAME AS LINKED_NAME,
  LR.COMPONENT_NAME AS LINKED_COMPONENT
FROM SpiraTestEntities.R_Requirements AS RQ
LEFT JOIN SpiraTestEntities.R_ArtifactAssociations AS AA
  ON RQ.REQUIREMENT_ID = AA.SOURCE_ARTIFACT_ID
  AND AA.SOURCE_ARTIFACT_TYPE_ID = 1
  AND AA.DEST_ARTIFACT_TYPE_ID = 1
LEFT JOIN SpiraTestEntities.R_Requirements AS LR
  ON AA.DEST_ARTIFACT_ID = LR.REQUIREMENT_ID
WHERE RQ.PROJECT_ID = ${ProjectId}
  AND RQ.IS_DELETED = False
How the Query Works:
- First, we start by pulling our main list of requirements using a SELECT statement. These will serve as the base rows in Column 1.
- JOIN #1: In Spira, links are stored in a custom report view called the Artifact Associations table. Because links are directional, we JOIN our base requirement's ID to the SOURCE_ARTIFACT_ID. We also specify ARTIFACT_TYPE_ID = 1 because the ArtifactTypeId = 1 is assigned to Requirements (ensuring we don't accidentally pull links to test cases or incidents).
- JOIN #2: The associations table only stores ID numbers, not names. To get the actual names and components of the items we linked to, we must join the Requirements table a second time. We do this by matching the DEST_ARTIFACT_ID to the requirement ID.
- Filtering using a WHERE clause: Since the query evaluates all requirements as valid starting points, it will naturally attempt to place downstream components into Column 1. We use this filter to explicitly exclude those secondary items, ensuring only base-level requirements populate the first column.
If you preview the raw ESQL data, you will see duplicated rows for every link. For example, if a Base Requirement has three items linked to it, it will appear in the raw data three times.
We use XSLT to group those duplicates by their REQUIREMENT_ID, collapsing them into a single row, and then pivoting the linked items into the correct columns based on their LINKED_COMPONENT value.
6. Copy and paste the XSLT template into Template section:
<?xml version="1.0" encoding="utf-8"?>
<xsl:stylesheet version="1.0" xmlns:xsl="http://www.w3.org/1999/XSL/Transform">
<xsl:key name="ReqGroup" match="*[REQUIREMENT_ID]" use="REQUIREMENT_ID" />
<xsl:key name="ComponentGroup" match="*[string-length(LINKED_COMPONENT) > 0]" use="LINKED_COMPONENT" />
<xsl:template match="/">
<table class="DataGrid" style="width:100%">
<tr>
<th>Requirement Name</th>
<xsl:for-each select="//*[string-length(LINKED_COMPONENT) > 0][generate-id() = generate-id(key('ComponentGroup', LINKED_COMPONENT)[1])]">
<xsl:sort select="LINKED_COMPONENT" />
<th>
<xsl:value-of select="LINKED_COMPONENT"/>
</th>
</xsl:for-each>
</tr>
<xsl:for-each select="//*[REQUIREMENT_ID][generate-id() = generate-id(key('ReqGroup', REQUIREMENT_ID)[1])]">
<xsl:variable name="CurrentReqID" select="REQUIREMENT_ID" />
<tr>
<td>
<xsl:value-of select="REQUIREMENT_NAME"/>
</td>
<xsl:for-each select="//*[string-length(LINKED_COMPONENT) > 0][generate-id() = generate-id(key('ComponentGroup', LINKED_COMPONENT)[1])]">
<xsl:sort select="LINKED_COMPONENT" />
<xsl:variable name="CurrentColComponent" select="LINKED_COMPONENT" />
<td>
<xsl:for-each select="key('ReqGroup', $CurrentReqID)[LINKED_COMPONENT = $CurrentColComponent]">
<xsl:if test="position() > 1">, <br /></xsl:if>
<xsl:value-of select="LINKED_NAME"/>
</xsl:for-each>
</td>
</xsl:for-each>
</tr>
</xsl:for-each>
</table>
</xsl:template>
</xsl:stylesheet>
7. Click [Save] twice and you can run your report.
This XSLT acts as a true pivot table—if a user adds a brand new component to their project tomorrow, the report will instantly generate a new column for it without any code changes!
XSLT key features:
Dynamic Headers: Second <xsl:key name="ComponentGroup" />. In the header <tr>, it loops through this key to print a <th> for every unique component name it finds in the raw data.
Alphabetical Sorting: <xsl:sort select="LINKED_COMPONENT" /> so the columns automatically arrange themselves alphabetically (e.g., Architecture, Design, Testing).
Empty Column Prevention: [string-length(LINKED_COMPONENT) > 0] to ensure that if a requirement has absolutely no links, it doesn't accidentally generate a blank column header.
Dynamic Data Cells: Inside the row loop, it iterates through those exact same columns. It checks the current row ($CurrentReqID) against the current column ($CurrentColComponent) and populates any matching links.
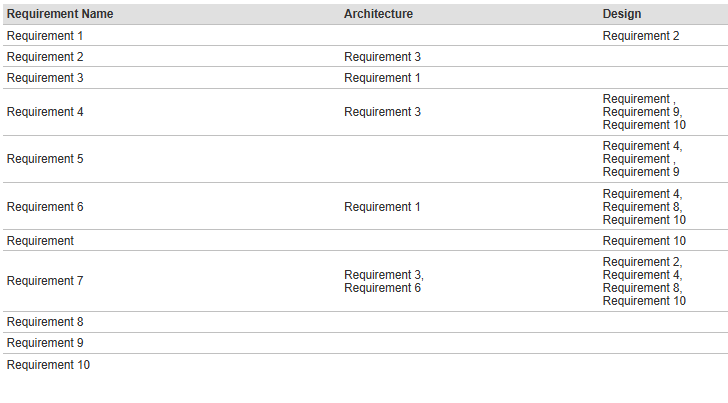
8. Running the report and expected output
As a result of the report execution you should get something like: