Overview
Appium 2.x supports the appium-device-farm plugin, which allows you to manage multiple connected Android/iOS devices and emulators from a single centralized hub. Starting with version 10.x of the plugin, you can secure your device farm using token-based authentication. This article explains how to configure the secured device farm and securely pass your credentials using Rapise.
Prerequisites
Before you begin, ensure you have a working mobile automation environment. The following must be installed and configured on your machine:
Node.js and Appium 2.x installed globally.
Android Studio (for Android SDK, platform-tools, and emulators).
The necessary Appium drivers (e.g., uiautomator2 for Android) installed.
Part 1: Install and Secure the Appium Device Farm
1. Install the Device Farm Plugin
Open your command prompt or terminal and install the plugin:
appium plugin install --source=npm appium-device-farm
2. Initialize the Database
Because authentication relies on a database to store user and token information, you must run the setup command before starting the server:
appium plugin run device-farm setup
3. Start the Server with Authentication Enabled
Start your Appium server using the flags to enable both the plugin and its authentication module. We also recommend setting the base path to /wd/hub for maximum compatibility:
appium server --use-plugins=device-farm -pa /wd/hub --plugin-device-farm-platform=android --plugin-device-farm-enable-authentication
Part 2: Generate Access Key and Token
With the server running, you need to log into the Device Farm dashboard to retrieve your connection credentials.
Open your web browser and navigate to the Device Farm UI: http://localhost:4723/device-farm
Log in. (Note: By default, the plugin creates an admin user with the password admin. You can use this or create a dedicated automation user, such as rapise).
Click on your profile name in the top right corner (e.g., rapise) and select Profile from the dropdown menu.
On the left-hand menu, select API Tokens.
At the top of the page, locate and copy your Access Key (e.g., rapise_aKVOAwqOl3Ngc).
Click the Generate New Token button. Provide a name for the token (e.g., "darwin").
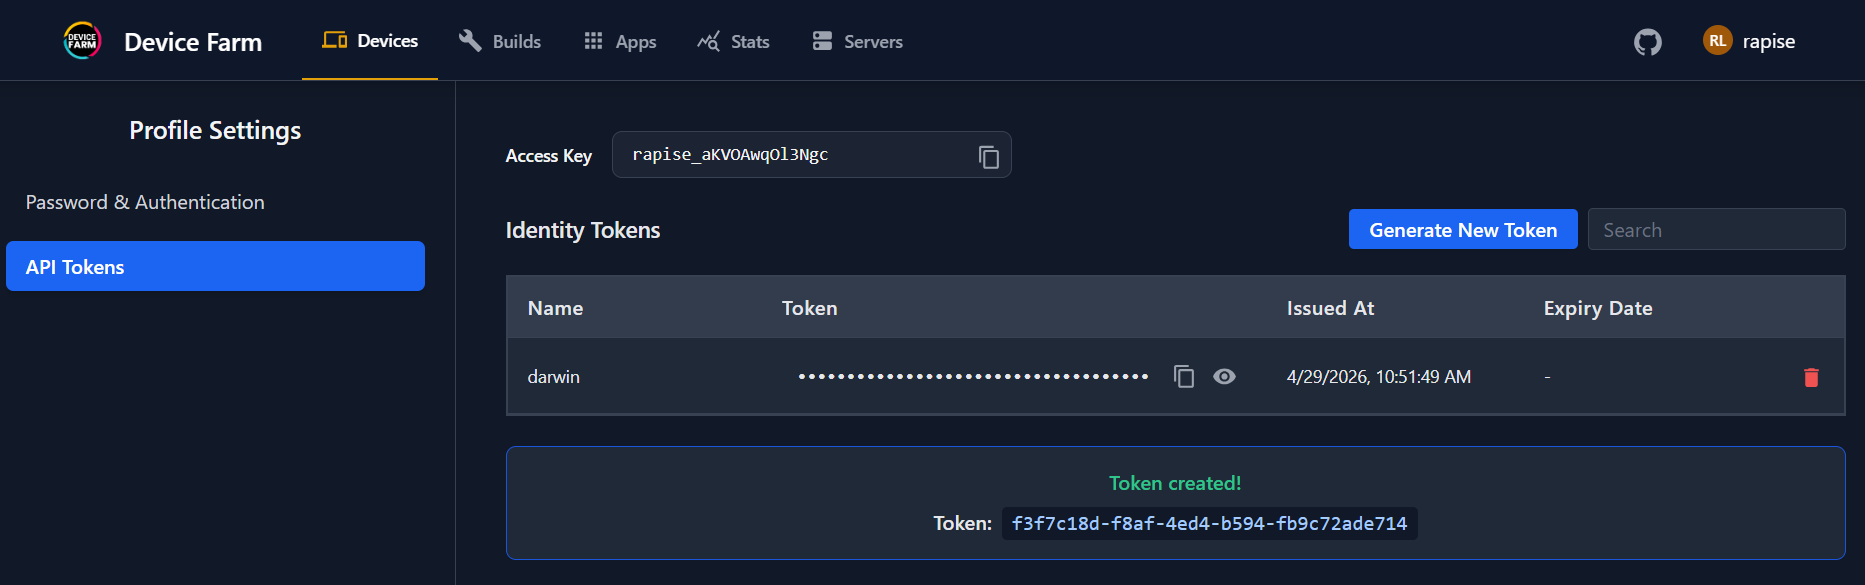
Important: A green banner will appear at the bottom of the screen displaying your new Token (e.g., f3f7c18d-f8af-4ed4-b594-fb9c72ade714). Copy this immediately, as it will not be shown again.
Part 3: Configure Inflectra Rapise
To route tests from Rapise to the secure Device Farm, you must point Rapise to the Device Farm server and pass the credentials you just generated as Appium capabilities.
Step 1: Set Up the Mobile Profile
In Rapise, go to Settings > Mobile Profiles.
Create a new profile or edit an existing one (e.g., name it Android DF W).
Set the Server URL to your local Appium instance: http://127.0.0.1:4723/wd/hub
Configure your standard desired capabilities (e.g., platformName, automationName, app, etc.) using the Rapise profile editor grid.
Step 2: Pass Authentication Capabilities via Common.js
To pass custom Appium capabilities with specific prefixes (like df:accesskey and df:token), we utilize the GetAppiumNonProfileCapabilities callback function in Rapise.
Open your Rapise test framework.
In the Object Tree view, double-click on Shared\Common.js to open it in the editor.
Add the following function, making sure the profile name matches the one you created in Step 1, and replacing the key/token with the ones you copied from the Device Farm dashboard:
/**
 * Injects custom capabilities for specific mobile profiles at runtime.
 */
function GetAppiumNonProfileCapabilities(profile)
{
    var caps = {};

    // Check if the current executing profile is our Device Farm profile
    if (profile == "Android DF W")
    {
        // Appium Device Farm specific authentication capabilities
        caps["df:accesskey"] = "rapise_aKVOAwqOl3Ngc";
        caps["df:token"] = "f3f7c18d-f8af-4ed4-b594-fb9c72ade714";
    }

    return caps;
}
Important Note for Recording:
By default, the Common.js file is only loaded during test playback. To ensure that your callback function is also executed and capabilities are injected when you are recording a test, you need to auto-load it.
To auto-load a shared file on both playback and recording, select Common.js in the Files tree, open the Properties pane, and set the Tags property to: shared,recorder
Step 3: Run Your Test
When you execute your test using the Android DF W profile, Rapise will automatically merge the standard profile capabilities with the ones defined in GetAppiumNonProfileCapabilities. The Appium Device Farm will validate the df:accesskey and df:token against its local database and allocate an available device for your automated run.